Saturday, 13 September 2014

White washed floorboards...

...Inspiration

OK, so as I'm typing this, I am actually stuck in the kitchen...
...I have been spending this week whitewashing our living room floorboards, and I applied the final coat of wax this morning....So now I am stuck, waiting for it all to dry!!

I love wooden flooring, and it was one of those things that made us choose our house in the first place: But our living room, being at the back of the house, is quite dark....not helped by the original,yellowing pine wooden floorboards. And as time has passed they'd become a bit grubby and worn, leaving me longing for those beautiful Scandinavian style whitewashed wooden floors!

Earlier this year, Mr. and I decided we would invest in some new Laminate flooring, but as faith would have it, we had to abandon our plans for financial reasons...
I was gutted!
But determined to make the best of what I had to work with, I have now , as mentioned above, given our battered old floorboards a new lease of life, by whitewashing them myself...A how-to post on this is coming soon!!
But for today, I will show you some images I found on Pinterest that inspired me to do this in the first place!! (I have tried to credit the original sources where I could):
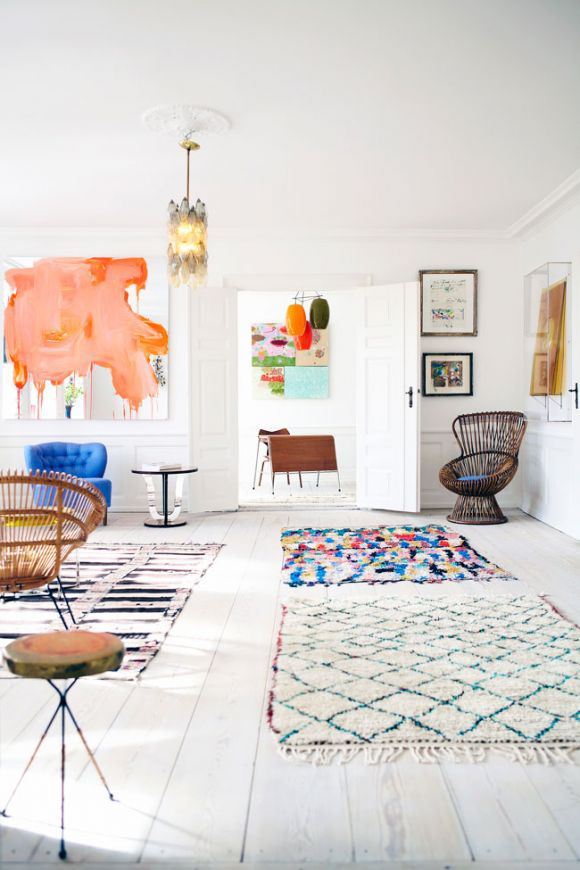
Image via uncovet

I just love the way you can , just about, see the original grain of the wood through the whitewash:
It looks so elegant and effortlessly chic...Not to mention how it makes a great canvas for colored and textured rugs!

Image via apetycznewnetrzearpe
We have white walls in our living room, as I am a big fan of the Scandinavian all white interior look...with the whitewashed floorboards it looks bright and airy! By adding lots of different textures to the room , you can avoid it all looking too stark and cold.
(I just loooooove the textures in the image above....and that sofa cover!!)

Photo cred: Hemma hos Larsons
Some people worry about the upkeep of whitewashed wooden flooring, but if it's finished correctly with a good hardwood wax, it is actually surprisingly easy to keep, by just mopping it down with a damp rag once a week...and it looks so nice and clean!
Image via blackbirdstyle
Whitewashed floors comes in different looks and finishes: You can get a barely there look by just lime-washing the wood or a more dense look by using paint. It can be as smooth and finished as you'd like, or maybe a bit distressed looking....it all looks beautiful to me!!

Image via the marion house book
Maybe it's because I'm Norwegian, and I have that yearning for all things Scandinavian....or maybe it's because it is a trend that has been brought to the forefront of my mind, as I keep seeing more and more of these beautiful whitewashed floors in magazines, on instagram and various interior blogs... but I am absolutely in love with this look, and am feeling rather pleased with myself that I have just given our living room this treatment...
As mentioned above, I will post  how-to whitewash your wooden floorboards next week, along with a little sneak-peak on my living room Scandinavian style makeover!
https://www.blogger.com/blogger.g?blogID=5334983011637438110#editor/target=post;postID=8284451819364864907;onPublishedMenu=posts;onClosedMenu=posts;postNum=18;src=link

Friday, 12 September 2014

Today is international "Make your bed day"!!

...did you know that??
I know, right...there's a day for everything!!
But this is one I can get behind!!

Image from Laura Thomas Linens
(this is a sponsored post, and all images are from Laura Thomas Linens)
I make my bed every day...it's true, I do....but sometimes I don't get around to it until maybe 5 o'clock in the afternoon...LOL! It doesn't matter: it just makes such a difference come bedtime, when you peel your bedding aside, and get in....AAAAhhh! 
The only thing better is the feeling of getting into a FRESHLY made bed, with new bedding!!
They say you should always buy the best bedding you can afford....and I agree!
There are few things as important as a good nights sleep, and getting into bed at night should feel like a treat!!
So when Laura from Laura Thomas Linens sent me out some of her gorgeous organic cotton pillowcases earlier this summer, I was in heaven!
Not only is the quality superb...(like nothing I've ever had before...because up until now I've been a cheapskate when it comes to paying for bedding!!) but knowing that Laura has taken the care to make sure that all her products are fair trade, ethically produced and in keeping with the GOTS (Global Organic Trading Standard) meant that I could go to sleep with a clear conscience...No more "made in china" bedding here!! Oh no seree!!


I love it when blogging gets me in touch with people like Laura: Passionate, fair and with a great sense of style. 
Scottish lass, Laura dreamed up LTL after she had an "epiphany" whilst living in Edinburgh:
 "my bedroom window overlooked Edinburgh Castle.  While supping on a cup of tea one Sunday morning in bed and looking up at the Castle, a thought popped into my head.  What did the Kings and Queens of yesteryear's bedding look like?"

She started the company whilst living in New Zealand in 2012,where she has been living for the past 9 years , and aimed to supply the market with good quality, mid prized bedding and sheets that were both ethical and affordable:
Non of her products are mass produced, they are all unique one-off designs. Laura ensures prices are kept down by working directly with her suppliers in countries like India and Vietnam, but as mentioned above, with strict criteria on the workers daily conditions:
"I currently deal with a Vietnamese Commune that supply beautiful hand embroidered bed linen and have actually seen images of the lovely ladies who stitch on my detailing!"


Laura also runs the beautiful and inspiring lifestyle and interiors blog laura thomas interior design, featured in my blog roll...do check it out for some beautiful images of inspiring interiors as well as great DIY ideas!


Until I got the "interior bug", I (as previously mentioned) never gave bedding much thought....as long as it was clean: But having discovered the joys and beauty of quality bedding through LTL, I am now a true convert: It's got to be 100% cotton or linen and preferably organic...
...its a luxury, I know...but one I can safely say that I deserve!!

So go on...get to it: make your bed: It'll be sooo worth it!!

Our bedroom is ALMOST finished...only the chest of drawers left to fit, before I can show you all my new haven!! It's been a long time coming, I know...but stay tuned!


https://www.blogger.com/blogger.g?blogID=5334983011637438110#editor/target=post;postID=8284451819364864907;onPublishedMenu=posts;onClosedMenu=posts;postNum=18;src=link

Wednesday, 10 September 2014

AMARA interior blog awards


WOW!
I am so happy to announce that Nostalgiecat has been nominated for yet another Blog award!!
This time its the more industry specific AMARA interior blog awards.

For the first year running, hosted by the  leading worldwide luxury retailer Amara , this is set to become a heavyweight of an Award specifically aimed at Interior bloggers!!

The Vitra. range at Amara
The Amara team says that they believe that bloggers are an integral part of the interior design community and that they wanted to create the Amara interior blog awards to "award them for all of their amazing work."*
More than that they promise to
 "bring you the largest, most glamourous blog awards you’ve ever seen. With the award ceremony set to be hosted at the lavish Rosewood Hotel in London, sponsors such as Missoni Home..."*

And with judges like Martin Waller of Andrew Martin international , the founder of the pinnacle of the interior design industry: The international interior designer of the year awards and the man behind  "the bible of the interior design world", the interior design review  I believe them!!


Image from Andrew Martin

So I feel absolutely honored to be nominated for BEST DIY BLOG...(if not a little out of my debt as well) . The competition is stiff, and I am in very good company, so if you enjoy all my projects and tutorials for the home here at Nostalgiecat, please spare half a minute to give me your vote...just click on the image below:


amara interior blog awards

There are 11 other categories as well: Best architecture blog, Best colour inspiration blog , Best designed blog , Best design inspiration blogBest fashion inspired blog , Best international blog , Best luxury blogBest newcomer blogBest organisation blog and Best stylist interior designer blog...So if you love interior design, you might want to check out the other categories....who knows you may find your new favorite blog among them all!!
Finally, there is The editors choice awards:
"a special award for someone who the judges think really stands out as an exceptional interior blogger. Any of the final shortlisted blogs can win this award and will even walk away with an extra special prize!"*
So if you enjoy Nostalgiecat, please don't hesitate, give me your vote now, so I'm in with a chance of making the shortlist!

I also just wanted to take this opportunity to thank you all for all your votes for the Cosmopolitan blog awards, where I am up for best interior blog...You are all superstars! Voting is now closed for the Cosmo awards, and all I can do is dig out the glad-rags for the award ceremony in October and keep my fingers crossed !
 I really wasn't expecting to be in the running for yet another award....this year is turning out to be amazing for my little blog, thanks to YOU: my amazing readers!!  I hope I have your continued support for The AMARA interior blog awards!!
You can vote for me here!
I adore you all!!
Signing off with extra kisses today, again:
xxxxxxxxxxxxxxx
https://www.blogger.com/blogger.g?blogID=5334983011637438110#editor/target=post;postID=8284451819364864907;onPublishedMenu=posts;onClosedMenu=posts;postNum=18;src=link
*extracts from the Amara interior blog awards website

Saturday, 6 September 2014

DIY filing cabinet label stencils...Free download!

(+ how to get permanent marker off a smooth surface)
...and a little bonus surprise at the bottom of the post!!

OK...So you all know how my loft into work space makeover turned out (If you are new here, click on the link to see this amazing transformation)... I was inspired by these images of inspirational work spaces, and I especially fell in love with the filing cabinet in the top image...
So in true nostalgiecat spirit, I decided to use this old IKEA filing cabinet we already had, and give it a little makeover:


OK, so its not a gorgeous vintage filing cabinet, but inspired by the one I fell in love with, I decided to replace my husbands scribbled labels with some Army-type stenciled ones...

First problem was: How to get rid off the permanent marker pen!


Using a regular pencil eraser/rubber , I rubbed off most of the marker pen...This is not done in a hurry: have patience: It will take some time, and elbow grease!! The same goes for the next step:
Using some toothpaste, rub the remaining marker pen stain with a cloth/some tissue...
Persevere: It will all come out this way eventually!!
There are other methods of removing permanent marker pen off smooth surfaces (You can find some here ) but I've tried them all, and this was the way that seemed to work best!!

 Anyway...Once I'd cleaned off the old permanent marker on the filing cabinet, I designed these stencils to replace my husbands handwritten labels:


As you can see, I've added a couple of extra labels, that I thought could be of use to you all!
You can download the flipped label designs here and here!
The design needs to be flipped to create the stencils.

To create the stencils, you will need:
Printer
Some sticky back plastic
Scissors
A scalpel
Some tape
A cutting mat
Spray paint


Cut some sticky back plastic to A4 size, and print out the templates on the papered back of the sticky back plastic! (You can of course adjust the size of the lettering on your computer)


Cut out each individual label, tape it down to your cutting mat, glossy side up...


Use the scalpel to carefully cut out the black letters...
REMEMBER its the surrounding sticky back plastic that you'll want to keep!!
TIP: Cut along the longer lines first, and always cut towards your last cut, the smaller cuts can be made by just pressing the scalpel down into the design...this way you minimize the risk of messing up and tearing the surrounding sticky back plastic!


When you have cut out the design, peel off the paper backing on the sticky back plastic, and carefully place it onto the surface....Smooth down, taking care that there are no gaps between the SBP and the surface...


Mask off any surrounding areas if needed then gently spray paint the stencil!
Several lighter dustings of spray-paint will work best!
NB! ALWAYS use spray-paint in a well ventilated area/outside!

When the paint has dried, peel off the SBP , to reveal your new stenciled labels:


It looks a lot better now, don't you think??


It may not be a statement piece, but as they say: The devil is in the detail!!
And it makes for essential storage for Mr's paperwork!

FINALLY....
Here's a little bonus free download for you all:
Click HERE to download the pattern for the stencil I used to make my "I WILL SURVIVE" plant pot/basket, pictured below, and follow the same steps as above!!


Enjoy!

 I am having a little DIY-project break next week, whilst I am planning my living room makeover...but don't worry I have several projects  and useful tips to share with you all...as well as some interesting design news!!

xxx
June

Wednesday, 3 September 2014

Autumn style report


Summer is over...
yup! Sad but true! I hope you've all had a great one!! 
Ours has been one of mixed emotions for some very personal reasons, and to be honest, I am feeling a bit drained...
But summer is now officially over, the long summer days are getting shorter and temperatures are sinking, and with Little Miss Moo starting back at school again yesterday, there is just no denying it: Autumn is here!!
I am always left feeling a bit melancholy after the summer, this year more than most....so I thought I'd indulge in a bit of inspiration-searching on the web...to lift my mood!
And do you know what(?): I am now actually looking forward to getting cosy this autumn!!
There is beauty in all seasons, but Autumn is the one where you can revel in the darkness and for many it marks a "fresh start"...especially in design terms!!

So here's a few of the interior design trends for Autumn that I find inspiring and appeals to me!!

Image via Greige

First...Lets talk color:
A trend I keep seeing popping up for autumn, is black!!
 Not for the faint hearted, I will admit: we are talking black walls!! I have long been a fan of the blackboard wall, but this is one step further! If you have a suitable space (And yes, only a certain kind of space can handle this kind of treatment...) it will add a certain elegance and edge, but at the same time also a cosy cocooning effect to your interiors. Paint the whole room black for maximum impact, or if you are feeling this trend, but not THAT brave, try painting just one feature wall, and add lots of black accessories to suit!!The only  "rule" is (I am not usually a fan of design "rules", but this one agrees with me!!) to keep the paint matte!!This way you avoid that 80's yuppie feel!!
Try "Off-black" by Farrow & Ball for the "right" look!!


Perhaps this Black trend appeals to me because it kind of matches my current mood, but I find myself strangely soothed by these dark interiors...however, black walls is not a trend I will try in my home, as our house is quite small and dark as it is...Nope..I'm still a, true to my Scandinavian roots,  white wall kind of girl...

Image via Deco crush

Having an all white interior, makes everything seem bright and airy...and creates a blank canvas that you can introduce whatever colors and accessories that suits your mood to...making your furniture and artwork pop!!
However, an all white interior can seem quite stark and cold...especially now in the autumn!
Scandinavians love All white interiors...perhaps because it creates an illusion of light in the dark winter months. But how do you make an all white room seem cosy?? Take a leaf out of the design obsessed Scandinavians of course...The starkly monochrome Interior trend in Scandinavia is now making way for some softer touches of colour this season, and dusky pinks,peach and mustard tones together with mint seems to be THE colours for autumn!!
Image source: Bolia
Maybe because they blend so well with the grey and petrol shades popular earlier in the year...I am really loving these colours as I think that they will be easy transferable into next season as well!
I mean : who can afford to change their interior decoration completely with every season ??

Other things I am glad is staying on trend for Autumn/winter is  Concrete, metallics and geometric patterns!
The new colour palette almost squeezes even more beauty out of these:

Image source : Ferm living


Graphic and geometric textiles, in the form of throws, rugs and cushions....even a wall hanging ...add some sheepskins and leather for a snug interior fit for a cosy autumn evening... 
Image cred: Tobi Jenkins, found via daily mail

Metallics is having a BIG moment in interiors this autumn...Copper is still going strong, but now it's all about mixing metallics!! And I love this...being a magpie at heart!! It makes everything feel a bit luxe...but now metallics is not opulent in the traditional way: It's made modern and fresh by keeping the shapes masculine and geometric, and by mixing them with other juxtaposed materials, such as concrete or smokey glass..
Image source Hanne Willmann

In fact, mixing materials: the rough with the smooth is a trend I am crushing on big time at the moment....and it seems that the design world is having a moment with sculptural vessels of all sorts: Big ballooning vases, tea light votive s and decorative bowls, geometric shapes in delicate materials such as porcelain...

Image source: Finnsdottir
Stuff like this really excites me...call me materialistic if you want: But I just love beautiful things...even if its only to dream about!! Imagine a stormy autumn evening, wrapped in a cosy blanket, curled up in the sofa with a good book, surrounded by lots of soft and flickering candle light in beautiful votives...THAT spells autumn at it's best to me!!


In terms of furniture, I think the image above demonstrates very well the ongoing trend of old meets new: There is still a lot of love for the mid-century style, and I cant see this trend changing for a while:
Even the new furniture designs coming out, is inspired by the iconic furniture of the 50's :

Image source: Ropke design


And the Danes seems to have this design trend all sewn up: Just check out the new collections from MuutoBolia (whicn now by the way SHIPS TO ALL EU COUNTRIES...YAY!!) and housedoctor.

 Key words for the current furniture trends, seems to be: 
Image source Oyoy

...Scandinavian blond wood
It looks fresh and modern, at the same time as it has that nostalgic nod to iconic mid century design, which I love...In particular I've fallen for the range (pictured above) from Oyoy...as it has a slight feel of traditional, old native northern Scandinavian Samii-culture...
Photo cred : Pierre-Jean Verger via Desire to inspire
.....Industrial....
...I love elements of this style...it inspires me and gives me lots of DIY ideas..

Photo cred: An-magritt

And eclectic: Modern with new!!
This is probably the most accessible of the Autumn/Winter furniture trends, as its all about mixing old with new...Upcycling being key to this look!!
This is probably the look that will have the most staying power
,as it lends it self well to, not just all seasons, but a lifetime of home comforts!

Autumn is all about comforts: Good food and a warm and welcoming home!

Autumn is a time to prepare for the dark winter months and lots of level lighting, candles and a roaring fire, will make your home a sanctuary to come home to...The Danish term "Hygge"  is the perfect description for this feeling !
Image from housedoctor

So set the table, invite your friends around and revel in the warmth of your home...
...whatever design appeals to you: make your home a haven this autumn...
I for one, would not object to coming home to a house like this:
Image source: freshome
I know that design  can be inaccessible in terms of price and availability for most people, myself included...but there is nothing wrong in looking for things and environments that appeal to you: It can inspire as well as even fuel your dreams and aspirations..
Design and colours can be very powerful tools to improve your emotional life, and your sense of belonging!
And over the next couple of months I will show you how you can achieve this look and feel for less...through budget buys and DIY's as I am giving our living room a makeover!
But first I am sharing some more projects from my Workspace in our loft..

I hope you found my Autumn/winter style report as uplifting as I did writing it!!
Lets all welcome autumn...a fresh start to a more comfy life!!

https://www.blogger.com/blogger.g?blogID=5334983011637438110#editor/target=post;postID=8284451819364864907;onPublishedMenu=posts;onClosedMenu=posts;postNum=18;src=link

Saturday, 30 August 2014

Easy wall hanging DIY


Today I am sharing a quick and easy DIY!
Inspired by Jeran from Oleander+Palm's "land of nod" project.

Putting the finishing touches to our new work space in our loft, and introducing a bit of fun an color... this wall hanging being one!!
One of the best ways to add some textures to your walls is to use a wall hanging! I have shown you how to make a Macrame wall hanging  before, and I want to try weaving soon, but if you are after a quick fix, this one is for you: It is so easy, you could even do this with the kids! And it takes less than an hour to make!


All you need is a piece of dowel (I've painted the ends of mine), some wool in the colors of your choice and some scissors!


This is pretty self explanatory, but here's some brief instructions:
Simply measure out how long you want your wall hanging to be, and cut lengths of wool, double that!
Use 4-5 lengths at the time, fold in half and loop around the dowel as shown above.
Repeat with each color as you please, until you're happy with the look of your wall hanging!!


Plait 3 pieces of wool together and tie onto the ends of the dowel so that you can hang it up on the wall... 


Trim the ends with the scissors.


 And there you have it a tactile, simple wall hanging to add some texture to your walls!!

I am planning on doing some other types of wall hangings soon....weaving being one of them...so if you are after something a bit more ahem....complicated(?) then please pop back soon!!

xxx
June

Wednesday, 27 August 2014

DIY paper plant pot


Here's a little 10 minute DIY for you.

I have developed a new-found love of green plants recently, and plan to keep some in our new work space in our loft (God bless them, they know not what fate awaits...LOL)
As this is a rather new development, I am not really kitted out with stacks of beautiful plant pots...and in an attempt to save some money (I cant believe how expensive a nice plant pot can be....or maybe I have very expensive taste???) I decided to just make some out of paper to cover those ugly plastic ones that come with potted plants!


All you need is paper (I used wallpaper lining, which you can pick up cheap in any DIY shop....but any thick paper will do) scissors and tape! And something cylindrical to use as a template: I used an old gift box for wine...perfect size!!


meassure roughly how tall you'll need your pot-cover to be,add enough to cover the bottom and then cut the paper to size . Make a small fold at the top then "Pretend" to wrap up the wine box, taping it in place around as you go!


Then I pulled the paper "pot" off the wine box....


....and crumpled it up before placing my plants inside.


If you are thinking: What's going to happen when you water the plants?...I would suggest that you take the plants out before watering, and place a yogurt lid in the bottom of the paper pots to catch any drips after!

I think they look rather nice, don't you??
...and cheap as chips to make!!

xxx
June
"



