Wednesday, 8 May 2013

Norway May 2013

A Norwegian treasure hunt....

....looking for beauty


Oh how I wish I could take this home with me.... A beautiful wreck of an old chair exposed to the elements of nature... 

 .....and you will find....


The week I spent in Norway was a time for quiet reminiscing and reflection.
It was the first time I'd spent time there without little miss Moo since her birth, and I had a lot of time to think about the things that matter...such as family and belonging.
I decided to take my camera out and about on the only day we had with good weather...looking for treasure...

I love the colours and textures  and the way these rocks roll into the sea here on the west coast of Norway..

Beauty can be found all around us...it can be something obvious, like a pretty flower or a new tablecloth, or it can be something simple and everyday, something that reminds you of a fond memory, or the feeling of sunshine on your skin or the smell of rain on hot asphalt....
this is what I mean by a treasure hunt....trying to capture those moments that fill up your heart


Like coming across an old favourite spot by the sea, finding that the old boathouse you used to play in as a child has fallen down...beyond repair....Looking through the rubble and venturing into the ruins, trying to find something yesteryear and beautiful.....

...like my morfars old  pot, he used to empty his boat of water after a storm.... or an old chair leg...the beauty it holds lies in both its past and its future....


the beauty of adventure...places that get your imagination flowing
The magic of an old sofa....a beauty beyond repair (unfortunately), left to the mercy of exposure during a long cold winter.........


Or the gnarly bark of an old oak tree, where you used to have a swing as a child.........


  The window of the old house in the woods, where no one ever lived,yet had immaculate window dressings and furniture inside            
...........ignites the imagination...


 There is beauty in the way the spring sun shines through the branches of the tree on top of the hill...

 As I wander through these places, I realise that the most beautiful treasure of all is in the imagination of a child....every little nook and cranny, every stone and tree all holds an adventure and an untold story...like so many before, the best is yet to come......


It's always in the little things.

xxx
June

Sunday, 5 May 2013

mormor

In loving memory........


....Monday 22 April 2013 


......It was a beautiful day; the sun was shining and there was blue sky as far as the eye could see. I was sitting in a field in Hertfordshire UK feeling even more nostalgic than usual....

.......Back home in Norway my mormor(:mum's mum) peacefully passed away......


My mormor
22 June 1924 - 22 April l2013


I have just got back from attending my mormor's funeral in Norway.
It has been a really emotional week, as you can probably imagine...
If you've seen my previous post, you'll know: I knew it was coming.....still, that did not by any means make it any easier to cope with the grief of loosing someone so Important and influential in my life....by the time I got the call, I was already feeling emotionally drained.

I felt guilty that I hadn't rushed to her bedside to see her one last time, I felt regret for all the things I should have said to her, but never did, and all the things I'd wished I'd asked her about her life....

All I have now is my memories of a beautiful person that taught me so much, and the realisation of how influential she has been in my life....

Kausland kyrkje....where all our family's big moments: christenings, weddings and funerals has taken place.

I found the funeral a cathartic experience...
Mormor was a very popular person in our little coastal community, and the church was full of people wishing to say their last goodbyes and pay their respect. It gave me a sense of belonging to see my uncles and aunts, cousins and other relatives gathered together...a sense that although we'd just lost our matriarch , we were still a family, and in mormor and morfar's memory we will keep going . And in-between solemn hymns and words of God and Christ, the priest told us all a brief summary of mormor's life.....


The village of Steinsland, Norway, where I, my mum, my mormor and generations before us grew up.....

She grew up in the little fishing village Steinsland, on the west coast of Norway. The daughter of Bertha and Ingebrigt Bakke. Her father owned the local shop and was very much absent from her childhood. In fact her parents later divorced. So from a young age she helped her mother run the shop as well as raise her younger siblings.


She met my morfar(:mum's dad),Thomas Midttveit, just before the war. She was already engaged to a rich young man, but fell in love with the young fisherman when he rowed her across the fjord to get a dress fitted, and insisted on waiting for her to take her back across. So she broke off her engagement, to her family's dismay, and promised Thomas that she'd wait for him. The war (Norway was under German occupation) kept them apart until 1948, when they got married.


 The wedding picture of Kari and Thomas Midttveit, my mormor and morfar.

They had 5 children and made a life for themselves in the house she'd grown up in. Morfar made a living from working on fishing boats, and they lived a simple life: hand to mouth...living of the sea and growing their own potatoes.


Later they bought their own fishing boat and they lived and worked side by side at sea throughout their life...
Their door was always open, and as I lived with my parents right next doors, I spent time at my grandparents house almost every day growing up...I used to love watching mormor cooking in the kitchen, eating toasted brown cheese sandwiches at their table after school and picking flowers in their garden before morfar would cut the grass. I remember the sound of their crackling radio: reports from fellow fishermen of steams of mackerel or cod....they would rush down to their boat with a pot of coffee and some sandwiches and set out to sea in search of good fishing....come rain or come shine! I felt so safe and loved in that house...in their company!!
 They remained eternally in love, always together and the centre for our expanding family..... When my morfar passed away in 2009, mormor was heartbroken, but still remained the strong matriarch of our family.


My morfar's boathouse. It might not look like much, but my grandparents heart and soul lives on in this place.

I take great comfort to know that they are now reunited again ....I have a picture in my mind of Morfar waiting for mormor in the harbour with their boat, a pot full of coffee and a bottle of some quality cognac, ready to sail off into the eternal sea together for one last fishing trip....
My mormor and morfar's relationship has been an inspiration to me throughout my life. Their ability to live and let live without judging, but always with compassion, taught me to be true and humble. They've taught me the importance of family and roots.
  I have too many great memories of them to mention here, but they will always be a part of me....and I am so proud to be a Midttveit-girl!


All I can wish for is a life as filled with love as theirs..
Never forgotten


June


Saturday, 20 April 2013

DIY lace print plates: Glazing


Glazed lace print plates from nostalgiecat.blogspot.co.uk


 Following up on last weeks tutorial, where I showed you how to make these.... this week I have been glazing the lace print dishes I made last week.

I spent some time researching different finishes, from using mica powders (thank you to Dominique from http://craftingbydominique.wordpress.com for your kind advice on using mica powders) to using homemade glaze (see tutorial:how to make your own homemade gloss glaze).


But in the end I decided to use the original
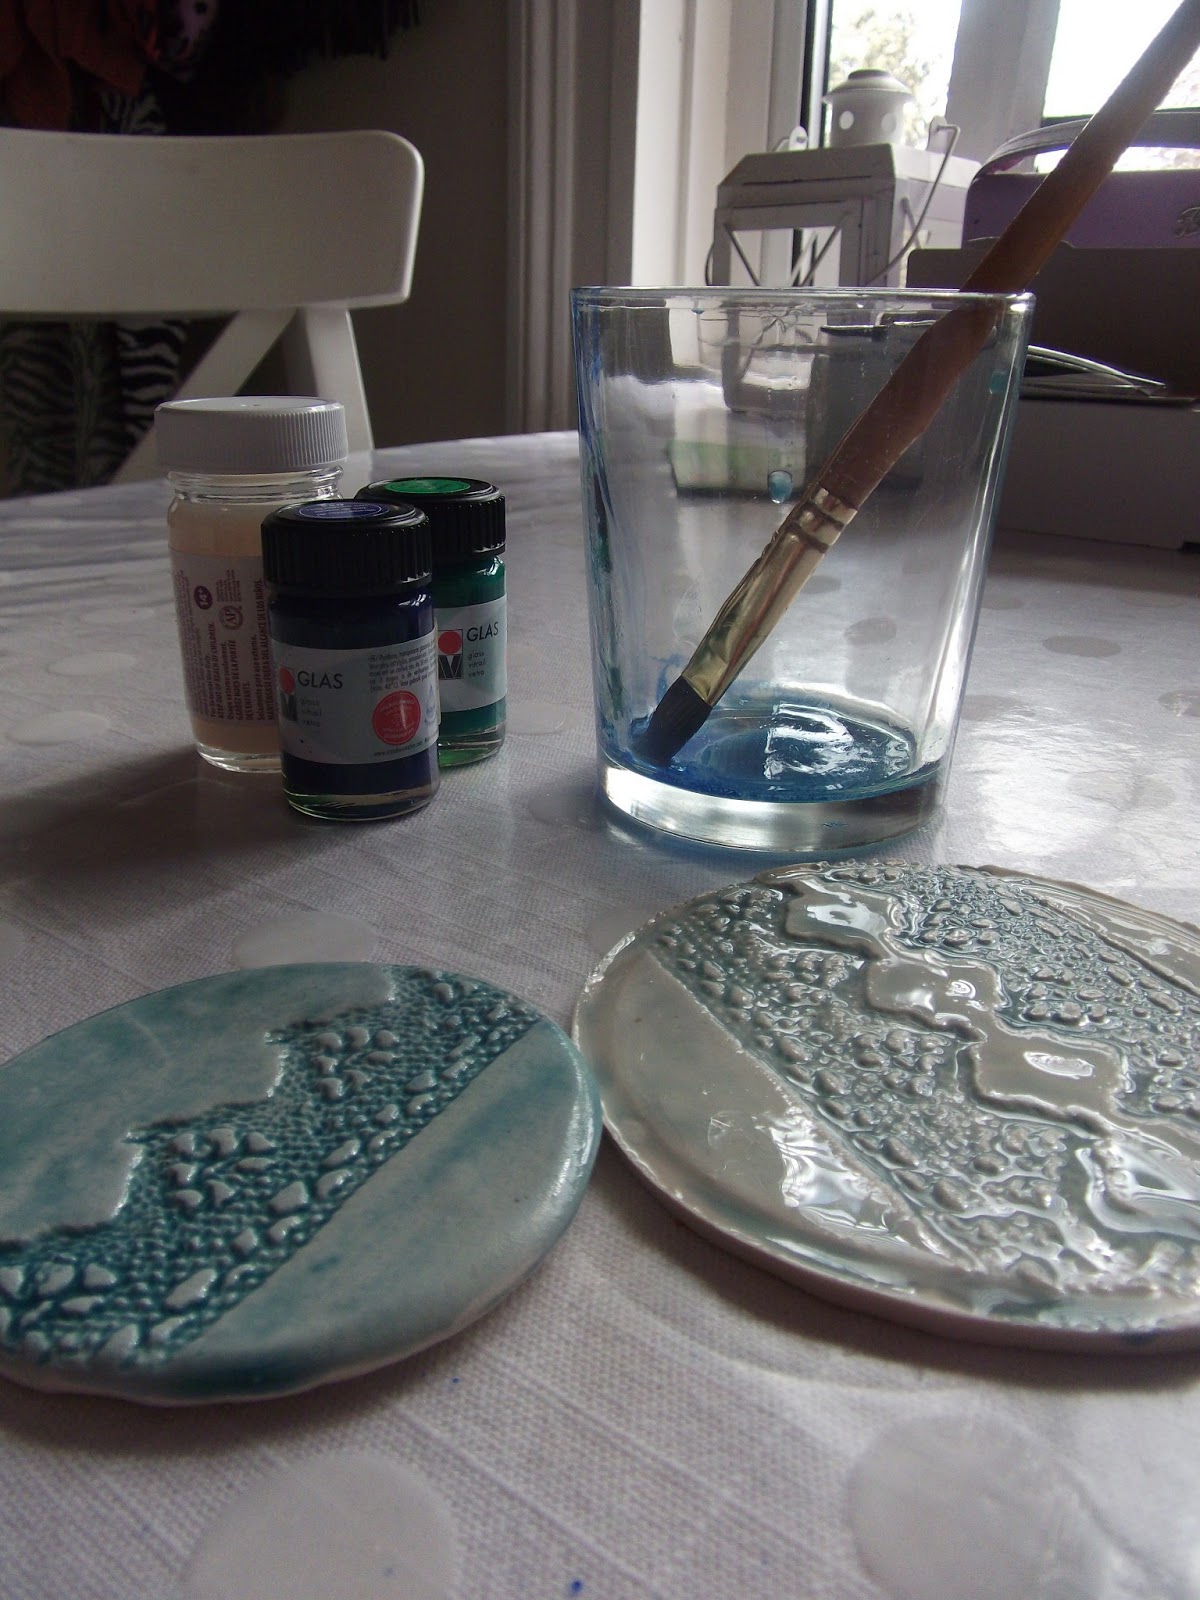
 gloss glaze from Sculpey mixed with Marabu translucent glass paints.
When mixing media like this, make sure they are compatible with each other : in this case they are both water based ,without any need for baking.
I chose this mix, because I wanted to add colour with a translucent feel to the glaze.

I decided to use a mix of blues and greens. 
Firstly I experimented by working on some samples to ensure that the mix had the right translucency  and color.


Then I simply painted on the mix with a soft bristle brush.....
....leave to dry for approx 30min


On the back of the plates, I simply saturated the surface with the glaze, then worked the it,using a brush, towards the edges, where I left it to pool at the rim. This created a nice band of stronger color.


When doing the surface of the plates, keep working the glaze into the pattern for the first 15 minutes to avoid it all running down and pooling in the plates. (after 15 minutes the glaze starts setting ,and you should avoid touching it at this stage, as that will lead to clumping)
Expect some pooling, as it is very hard to avoid all together.


When dried (30mins) I applied another layer of the glaze, changing the color slightly to add some depth, into the detail.


I used the same technique as above (back of plates) around the rim of the plates surface. I really like the effect it makes....


When I was happy with the look of my glazed plates, I left them to fully cure overnight, before finishing them off with a couple of layers of spray varnish to seal and protect the surface.


I am really pleased with my finished plates, and cant wait to hang them up on my kitchen wall (...when I eventually get around to decorating the kitchen....but thats another story for a future post). I have already had some orders for these from friends an family, and I think they make great presents...either on their own as jewelry trays or as a group like here, hanging up on a wall.....


Please let me know what you think of them by leaving a comment below. And if anyone has a tip about what varnish would be best to use as a sealant, please get in touch....(I used Plasticote clear spray varnish, but find It takes ages to properly set hard)
Thanks for looking, and please pop by tomorrow for some "behind the scenes" pictures..


xxJune

Wednesday, 17 April 2013

Centimental decorating


THINGS TO DO WITH LACE.......

sentimental decorating.....

.....the small touches


decorating with lace.....from nostalgiecat.blogspot.co.uk

Since when I last week made the lace printed jewelry dishes (See previous post), I've developed a crush on all things lace....


So, whilst I've been waiting for delivery of my glace, to finish them off, I've busied myself making some more easy and beautiful lace-inspired additions to our home....


....as well as box framing some of my family silver...
...you know the kind: beautiful heirlooms passed down through the generations, but regretfully quite useless in modern life...


This is the wedding picture of my great grandparents Bertha and Ingebrigt Bakke, from my family on my mothers side in Norway.


....so I've been trying to think of someway to show off the beautiful silver,given to my great grandparents on their wedding day, for a while now....seems such a shame to hide it all away in a drawer, as it holds such a sentimental value to me.


I think the framed silver looks great in the painted shadow box.


The candles I got from the bargain bin at Dunhelm Mills for 17 pence each...and simply decorated them with lace washi tape.


This cookie jar was another bargain find at Dunhelm Mills at £4.99....I've laced it up with lace trim, stuck on using double sided craft tape.
Simple,yet effective!


I think decorating with lace, has a sentimental and nostalgic feel...... and that's what nostalgiecat is all about!


Thanks for looking! I'd love to hear what you think of this post, so feel free to leave a comment below!
And please pop by at the weekend for another DIY tutorial on glazing my lace print plates (pray the gaze arrives in time) and some "behind the scenes" pictures.....

June


Friday, 12 April 2013

DIY lace print polymer plates

inspired by the TRULY INSPIRATIONAL AND ORIGINAL DIY LACE BOWL TUTORIAL from lovemarkscollection.com


DIY lace jewelry dishes from nostalgiecat.blogspot.co.uk

This week I have been enjoying myself making these beautiful lace printed jewelry dishes.
Part of their beauty is that they are really easy to make.


By pressing lace into oven bake clay you can get some beautiful patterns....


I am  going to show you how....


DIY tutorial


You will need:
Oven hardening white clay (I used Sculpey original)
Lace or doilies 
A rolling pin
A bowl or similar (used as a "cookie cutter")
Baking paper
Ovenproof dishes (to use for shaping the plates) 
A scalpel
Sandpaper or sanding block 


Lets get started........


1. Knead the oven hardening clay until soft and pliable.
Roll out the clay on a smooth surface like a cookie dough.
Keep rolling the clay with outward strokes until approx 5-6 mm thick. 
Tip: Keep turning the clay over on the work surface to prevent the clay from sticking whilst you roll it out.
Make sure you have enough surface space to measure out the size of the plate you want to make.(in my case: a turned over fruit bowl )

Note:  You'll get nicer edges to the plates if you use a bowl ,similar to this, to push the shape out of the clay, rather than cutting around using a scalpel or knife.


2.Before you press the lace into it, carefully transfer the rolled out clay to a sheet of baking paper. This will help you pick up your finished plate without distorting the shape or leaving fingerprints in the clay, ruining the beautiful pattern you are about to press into the clay.

Make a slight imprint with your "cookie cutter" in the clay, to mark out the area you'll want to print the lace on. Then position the lace/doily and pat down onto the clay. Then using a steady pressure with the rolling pin  carefully press the lace into the clay until level...


Then gently peel off the lace to reveal a beautiful pattern!!


3. Place your "cookie cutter" on the clay and press down firmly and evenly until through.
Then peel away the surrounding clay, leaving you with a disc shape. 
Knead the scraps to repeat processes 1-3, maybe with different lace....


Lift this disc into an ovenproof dish (with the right curvature to make your disc bowl shaped - I used my trusty vintage enamel bowls), with the help of the baking paper its laying on.


4.Bake in the oven in accordance with instructions on your packet of clay.
The Sculpey original that I used, needed approx 15 min per 5 mm thickness at 150 degrees/c*


Do not overbake!

Take out of oven, and leave in the ovenproof dish to cool down for no less than 20 minutes.


5. Whilst the clay is still a bit soft (cheesy), use a scalpel to neaten up the edges of the dishes


6.Then leave for at least another 2 hours to fully cure and harden, before sanding back the edges to finish off the dishes.


........and VOILA! Beautiful dishes to keep jewelry in, or to hang up in a group on a kitchen wall...


I really enjoyed making these, and think they turned out beautiful!! 
The set of 4 dishes I made,only cost me £13.95 for the clay, as I had the other bits and bobs from before.
I am going to look into getting them glazed , as I think they need a protective surface!
So watch out for next week's follow up tutorial:


Thanks for looking and feel free to leave a comment or question below, and I will try my best to answer....

xxxJune

"