Saturday, 16 August 2014

5 inspirational office spaces

Image via finn.no
The last couple of weeks me and Little Miss Moo have been busy working on turning our messy dumping ground of a loft space into an office/work-space/playroom...
With LMM starting year 1 in September, she needs a place to do her homework, as her room is too small for a desk....but more selfishly, I wanted to create a work space for my self: Somewhere I can get messy with all my projects (so I don't mess up our NEW kitchen, which has been my little hub up until now, and somewhere I can retreat to , to write my blog posts in peace and quiet (NOT on the sofa with Scoobie Doo blaring on the telly...like just now!!) Also somewhere we can all go to just hang out... So I've been spending a lot of time on Online looking for inspirational work spaces/ offices recently...
Today I want to share my top 5 most inspirational images:
#Top image is from a friend of a friends home in my hometown of Bergen, Norway, The entire house is just dreamy, but I particularly love the simplistic and rustic look of this work space: The use of old apple crates as shelves on the wall is inspired, and the framed child's drawing is soo cute.... And I lust after that filing cabinet!!
Norwegian blogger Elisabeth Johansen from pure interior has created this little working paradise.
I love the long desk with space for several, miss matched chairs: Ideal if LMM has friends around for some craft time... I also adore the wire mesh mood board on the wall: I may have to DIY one like it!!
 
Amalie Fagerli of the Norwegian blog Svenngaarden 's workspace is almost opulent.... yet functional, with the use of gold and metallics throughout! I love the gilded ornate frame used to display her mood board /images and the lushness of that green palm!! I also like how she's created a narrow shelf above her desk to help free up some desk space and keep it clutter free!


This space from blanaid is very close to what our loft space look like, with the slanted ceilings on either side, and I love the idea of the trestle bench along that wall and the way this lay out gives enough floorspace for a seating area and a rug on the floor where LMM (or me) can play !


My last picture of an inspirational work space is this one, found via vtwonen. Unfortunately I cannot find the original source, but it is obviously Scandinavian: Just see that lovely map of Scandinavia on the wall...I want one!! I love the monochrome and airy look in this room, but what really caught my eye, was the flooring: The sort of floor you don't need to worry if you spill some paint on....This work space is for creating in!! I also love the use of casters on the storage units, making them easy to move around to change the space!!


Follow along in the next couple of weeks to see how elements of these inspirational offices will be implemented in my redesign of our loft into a work space...
There will be some practical how-to's, some easy DIY's and some more creative and decorative makes ....and of course: the big Reveal!!


Thursday, 14 August 2014

AN ARTFUL LIFE


Last night I had the pleasure of meeting Kate from An Artful Life at the opening of her London pop up shop at the Folly!

"An Artful Life studio and shop was set up by Interior Architect Kate Whitfield. Kate designs and sources creative items that are beautiful, imaginative and on-trend to help customers create their own stylish environments to enjoy spending time in.
The eclectic collection is constantly changing and being added to. Many items are one-off vintage finds, some adapted, or hand-crafted in the studio, others are new and chosen for their beauty and modernity."*

*extract from the AAL website

Vintage school chairs, customized by An Artful Life Studio's
This was a first, for many reasons for me: my first experience of a pop up shop, my first face to face meeting with someone I've got to know through "blogworld"...and my first night out, solo, since having little miss moo!
And I must say: I picked a good one! 

Wooden stool with painted legs by An Artful Life Studio

In a relaxed atmosphere at the beautifully, trendy the Folly bar, Kate's collection fitted right in...and that themed with her friendly demeanor, made this nervous, small time blogger feel at ease straight away! Of course it helped that her collection of upcycled furniture and handmade home accessories  pared with handpicked items from a variety of designers, is right up my street!
CUBE cushion from A MIND'S EYE
In fact: if I could, I would fill my home with her collection ....and it would be so me!

So I felt at home! 
(albeit a perfectly styled home...filled with things I love,  heaving with stylish, merry people, where I was greeted with a glass of champagne!!....so, nothing at all like my real home then.....more like the home of my dreams!! LOL)


I adore the creative initiative Kate shows in her collection: Handmade macrame planters, upcycled wooden candlesticks, made from a vintage set of children's building blocks and hand painted retro furniture, from An Artful Life Studio, sits in perfect harmony with graphic print cushions from a mind's eye and hand picked home accessories from established interior lines, such as House doctor...All beautifully supplemented by original artwork, such as the Angela Morris-Winmill canvas below,  and modern prints from smaller graphic artists, like Letters on Love.


Kate's online shop is just bursting with eclecticism and original and unusual home decor....and I am pleased to tell you: All at affordable prices!!
Kate has certainly got an eye for not only aesthetically pleasing , modern design, but also for quality craftsmanship...something that shines through her collection!
So if you are after something a bit different for your home, I would highly recommend that you check out An Artful Life...not only will you be supporting the very talented Kate Whitfield in these early days of setting up her new business, but you may also find, and support THE next big thing in design, before they hit the mainstream!!

Here's my picks from her collection, for our new office/workspace (more on that coming soon...hint hint!!):
 From top Left :
Geometric make-up bag £4.50
Wooden stool with painted legs £130
White fade clipboards, set of 3 £17
"it always seems impossible..." framed print £36
Set of 3 wooden trays £15
Vintage wooden filing cabinet £150
House Doctor vase with handle £18.50
Vintage school chair £47

Of course, I didn't come home from my night out empty handed....here's my loot:


As mentioned above, I probably would've come home with half her shop stock, was it not for an annoying lack of money and arms for carrying!! (I did try my luck with a scratch card  earlier in the day, but with no luck.....as for growing more arms: No chance!! (Maybe for the best, that last one....??)

This is NOT a sponsored post, but an honest appreciation for Kate Whitfield's taste in home ware design, and a big respect for her talent and aspiration!! 
I wish you the best of Luck with An Artful Life, Kate....you deserve it!!
(OOOh ...I sound like such a fan....(which I totally am!!)

Go on...
Check out An Artful Life folks!


Monday, 11 August 2014

Create some uplifting DIY artwork....

...to set yourself up for a great day!


If you follow me on instagram, you will have seen this before....but today I want to share a simple and easy way to create some art for your walls!

All you need is a canvas, some blackboard paint and chalk...
Click play on the video below to see how easily you can create this...


Find a nice uplifting quote, and hang it in your bedroom so it's the first thing you see when you wake up, like I did, to set you up for a great day!!


I was struggling to work out what to do with this big empty wall in our bedroom, but this fits perfectly!!
I love it!
Of course you can change the writing at any time by wiping the canvas clean...
(Oh ....and meet "Arthur", our new family member...yes, I'm talking about the plant!!)

I am posting this early this week, as I am very excited to be attending the opening of the talented Kate Whitfield of An artful life's pop up shop in London this wednesday...I will tell you more about her and her new collection later in the week!!

Wish you all a great day....
...and remember:
Choose Happiness!!


Saturday, 9 August 2014

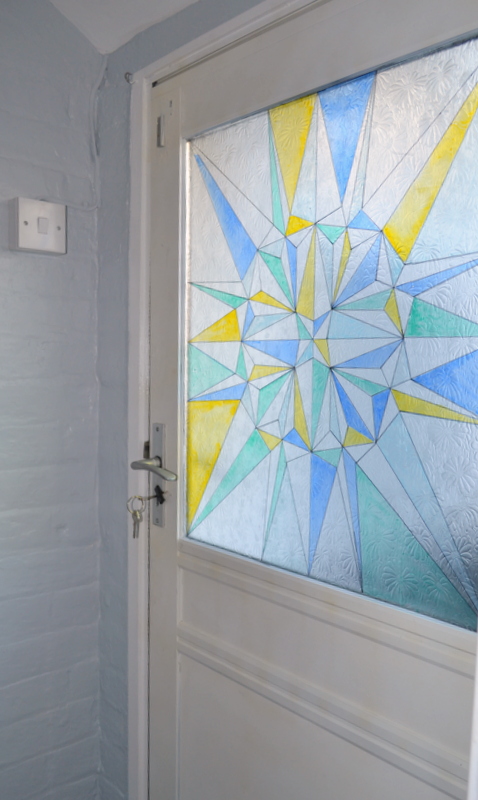
Diy faux stained glass window

Create a removable geometric window treatment


In my last post I showed you my mini hallway makeover, and part of this was my DIY faux stained glass window treatment for the back door! 

The problem was that , in the summer, when sitting on the sofa in the front room, you were nearly blinded by the light coming through the glass panel of the back door.....Sometime in the past someone had tried to solve this by installing a flowery glass panel , but with little success....besides: I hated that dated flowery glass panel!! Something had to be done!!

I love the look of stained glass, and if money was no object, I would've commissioned my friend (and amazing stained glass artist) Flora Jamieson of through the round window to make me a panel for the back door....but it is: Money is tight!!
Besides: That would've meant forking out for a new door as well, as her pieces deserve a better setting than this old PVC door!!
So, I freshened up the finish of the door itself with a few coats of spray paint, then I came up with this cheap but cheerful solution:

A removable faux stained glass design!
This project is perfect if you are renting, and have a window that could do with a privacy treatment!!

Today I want to show you what I did!


This project doesn't require a lot of supplies, just some
 sticky back plastic
Pencil and rubber
Ruler 
Tape
Permanent marker in black
...and I used translucent glass paints, but you could probably use marker pens in different colours as well!
Oh...and some glass frosting spray paint (Nice, but not necessary!!)


First you'll need to measure the glass pane you want your faux stained glass to go on, then cut apiece of sticky back plastic to fit (If the area is wider than the roll of sticky back plastic, simply join two pieces together with tape) Make sure you leave a margin of at least 1 cm all around so you can tape the SBP (Sticky back plastic) down to your table/work bench....Gridded paper side up!!


Mark out the area in which you'll want your design to fit!
Next you want to draw your design onto the gridded paper side of the sticky back plastic!

As I have a love of geometric shapes, I decided to make a star pattern to fit in with the pattern on the vinyl tiles I chose for the floor in my little hallway!! But of course you could choose any pattern that suits you,
( Maybe you could trace a pattern in a rug etc???) and use the technique described further down this post to create your own design faux stained glass!

I would've loved to create a PDF of my design for you all to download, but as it was so big I couldn't! 
And a step by step on how I created my design was way too complicated for me to explain, but I will give you some TIPS ON CREATING A GEOMETRIC DESIGN!

Geometry is maths....basically! So you might find a calculator handy! And a ruler is essential!!
And use a pencil and have a rubber handy....you will probably make a mistake or two!!
When creating a geometric design ALWAYS start from the middle!
So find the middle of the area you want to cover (See picture above).....


Working your way out from the center of your design, take note of measurements and work on one area at the time!!
This sort of Geometry is all about mirroring the shapes! So once you've created the first section of your design, its basically a case of repeat, repeat, repeat!!

Have a big pot of strong coffee to hand, because this is going to take some time....AND YOUR FULL CONCENTRATION!!


Work your way out from the center and repeat and mirror the lines from the first section!
When you have created the finished geometric pattern, trace over the lines with a marker pen! You will probably find that there are lines in your design you don't want to be part of your finished design, so leave those out! Use your ruler to get neat and straight lines!!


Next up, you want to flip the sticky back plastic over, so it's the plastic side up!!
Your design should show trough!
At this point, it would be helpful if you tape the SBP down to a removable surface, such as a piece of cardboard etc.


....I took my design outside and gave it 3 coats of frosted glass spray paint!
This is not strictly necessary, but will give the finished Faux stained glass a slightly more authentic feel + it creates a good "key" for the paint in the next step to adhere to!!


Right! So I chose to use some transparent glass paints to colour in my design....because I had some!! But I'm pretty sure using permanent pens in different colours would also work well!! (You've just got to be extra careful as to not make any mistakes!!)

First I experimented with colours on a scrap bit of SBP.
If you've created a geometric pattern like me, CONGRATULATIONS....you get an A+....only joking...Seriously: keep to 3-4 different colours, or this process can get very complicated!!


When I had made my choice of colours, I painted in my pattern using a different paint brush for each colour...


Again: Start in the middle of the geometric pattern and work your way out....try to spread the impressions of the different colours evenly throughout your design...
I painted every-other section of my stars, leaving white gaps in between...


Colouring in a geometric design can be complicated and could get confusing....you will most likely make some mistakes....If you are using glass paints, like I did, you can simply clean off the paint with a moist rag or for more detailed mistakes: Use a q-tip to correct!! (above)
If you are using  permanent marker pens to colour yours in, I would suggest maybe marking out which colour goes where with crayons before committing to pen!!


When you have finished colouring in your design, leave to dry/set for a while!!
Then dig out your ruler and black permanent marker again and trace over the lines, creating the "lead" effect!
I kept mine slim, but a thick pen-line would look great and more authentic!!


When you've traced all the lines, give it all a coat of clear varnish/ frosted glass effect spray and leave to dry!!
Your faux stained glass window is now ready to apply to the window pane!!

Trim off the excess SBP around the edges...


Peel off the backing at the TOP of your design (leaving the rest to hang down behind) and stick it to the top of the glass...
Next up You will need some pieces of paper, some tape and a credit card...


Tape a bit of paper to the glass surround, so that it hangs over your Sticky back plastic...this will help protect your design from rubbing off at the next step! (If your paper doesn't cover the entire area, tape another bit onto the first bit etc...)


Use the credit card to smooth down the sticky back plastic onto the glass.
Work on one area at the time, pulling your design taught as you go!Try to avoid creating any airbubbles or wrinkles, but if you do, use the credit card to smooth them down! 
Gradually work your way down your design, pulling more and more of the backing off the SBP....until its all up!


And there you have it: Your faux stained glass panel...


I never realized how difficult it would be to photograph the "stained glass" with the light coming through the window (near impossible!!) so I'm sad to say: these photos doesn't do this project justice: It really does look great!!


I love the way it has changed the light in my little hallway, and it certainly helps with that sun glare when I'm relaxing on the sofa in the evening!!!!
And should I ever tire of it: All I have to do is peel it off again!



Tuesday, 5 August 2014

Mini hallway makeover reveal

From messy dumping ground to useful and pretty!


OK! So this has been a little side-project of mine....a midst redecorating the kithcen....
Yes, I really have been busy!!

We have this tiny little hallway, leading out to the garden and the bathroom from the living room.
Because our house is pre-Victorian....built before bathrooms were considered a necessity, it is an extension at the back of the house, and it was added without much thought to a practical floor plan sometime within the last 80 years! This has left us with a tiny little hallway with no less than 3 doors leading off it!!
It is a a bit like "Takeshi's castle" (see minute 3:50 in the link...it's hilarious, I promise!!) trying to maneuver between the living room, out to the garden and into the bathroom!!
 It has a little recess, that used to house the gigantic old boiler ....which we replaced with a smaller modern one last year...But since then this space had become a messy dumping ground with exposed pipework and an uneven floor!
Que ugly "before" pictures:


A total mess, right??
So we got a carpenter in to box in the pipework and build some useful shelves in the recess.
He did a great job, creating shelves that fit around the new boiler and can come away if we need access to the pipework and with panels for access to the electrical sockets!


An improvement, for sure! But it still looked messy, as we didn't use our new storage to its potential...it was still a dumping ground!! And the manky old carpet (had probably been there since the 70's!!) along with the tatty magnolia painted walls made for a very dull space indeed!! (DON'T get me started on the color Magnolia: It's the epitome of DULL!!) 


The door leading out into the garden, was also looking past it's sell-by date, it was dirty with an old cat-flap that was falling apart. Another issue with this door was that in the summer, the evening sun would come straight through the glass panel and near-enough blind you if you were sitting on the sofa in the living room...making it impossible to watch a bit of telly!! (Yes, I LOVE watching a bit of telly in the evening....who doesn't??)

So although this was a very small space, it had some issues, and needed  makeover!!
Nothing fancy: A lick of paint, new flooring and some organizing... but of course with some "Nostalgiecat" style creative solutions, to keep the cost down!!!

And here's what it looks like now!!


A lick of paint...tick! New flooring....tick! Even the old door to the garden has had a makeover: I used spray paint to refresh the colour and installed a new cat flap! Even the glass panel has had a transformation, but more on that further down the post!!


I replaced the old carpet with some patterned stick down vinyl tiles...easy!! 


Comfortable under foot, and just the right colour combination to suit my taste...(I also love that they are called "Marrakesh", as that's where me and Mr had our last holiday(/before Little Miss Moo was with us....gosh that's 6 years ago: We really need a holiday!!)


I used the silvery grey paint I had leftover from when I stenciled the hallway, and my old bedroom curtains from IKEA has once again come in useful, covering the shelves and helps neatening up the space!!


I love mixing patterns, and the subtle colours of the vinyl tiles and the curtains works really well with each other, don't you think? And as luck would have it, the silvery grey paint is a great match to both!!


Here's the view from the bathroom, facing the door leading into the living room.


I made a removable "faux" stained glass geometric pattern for the glass panel in the door leading out into the garden!
Although subtle in the colours (bar the pop of yellow!!:)) it helps take the glare of the sun away when I am watching telly on the sofa!
I will show you how I made it in my next post!


Remember how messy my shelves were?? Well, with the curtain, I can hide it all away....
But I have made a conscious effort to organize this storage space:


As it is situated just outside the bathroom, it made sense to store laundry, towels and extra toilet roll here!
I also placed my beloved old gilded mirror there (My Farfar (grandad) gilded this for me when I was a child, and the frame used to surround the wedding picture of my great great grand parents....so it's very special to me!!) and created a space where I can do my hair and make-up, with easy access to the electrical sockets for plugging in the hair drier and my straightening irons!!


...freeing up the bathroom for other necessities! I'm sure this space will become very useful when Little Miss Moo becomes a teenager ....LOL!


So this space has gone from useless, awkward and messy to a lovely and functional space (although maybe still a bit awkward with the doors...)

This little makeover shows that with a little effort, you can make the most of the space you've got....and even an awkward little hallway can be beautiful!!

I love it! But for how long will I manage to keep those shelves tidy?  Only time will tell!! But even if they do get a bit messy, all I have to do is pull the curtain shut!!


Please spare a minute to vote for me for best diy blog in the Amara interior blog awards (click on the image below)

amara interior blog awards

"