Friday, 24 May 2013

IKEA hack: decoupage junior chair


Today I wanted to show you how I transformed Little Miss Moo's plain , white plastic junior kitchen chair.......
...I believe children's furniture should be fun as well as functional, so I decided to cover Miss Moo's junior chair with a fun print...

I will show you what I did...


I used:
sanding block
printed napkins (tiger tiger)
scissors
PVA glue
Decopatch glossy glue
Decopatch sealing varnish
Plasticote krystal clear spray varnish


After giving the chair a light sanding and wash, I prepared the napkins....


Cut the napkins into small squares....


If your napkin comes in several layers, as they often do, peel off the extra layers, so you are left with the printed tissue only...


Mix some PVA glue with a few drops of water.
The next parts of the process needs to be done in sections on the chair....

(unfortunately I somehow managed not to save the pictures I took during the making of this chair, so for the purposes of this tutorial, I have taken some pictures of a quick reconstruction on my kitchen sink....apologies) 


Paint the PVA mix onto the chair....
....leave to dry until tacky....
Try to make sure you are one step ahead with this before continuing on the next step of the process for each area....


 Using the Decopatch glue gently brush down the pieces of tissue onto the tacky surface...


Using the soft brush smooth down the tissue , take care not to overwork the tissue as it will break easily....
...continue adding pieces of tissue in sections, slightly overlapping each other..

 
...until you have covered the entire chair....
 

Then leave to dry...


The next step is to paint a layer of the sealing varnish all over....


This will give your chair a nice shiny gloss....


Allow to dry again....approx. 2 hours.


When you are sure all the glue have dried, you are ready for the final seal of spray varnish....


Make sure you do this in a well ventilated area......
....let dry fully...(and don't do what I did and leave it outside....in the rain!!! Doh!)


from plain to patterned in one day.....
......an a whole lot funner!!
Little Miss Moo loves her "new" chair.... 


Thanks for looking....

xxx
June



Thursday, 23 May 2013

Welcome to Nostalgiecat

HI 

My name is June,
Nostalgiecat is my creative outlet for all the little and large projects I undertake whilst redecorating our Victorian terraced cottage here in Hertfordshire, UK.....making this house our home!!


I am an artist, working mainly in concrete, and stay-at-home mum to "Little Miss Moo" (My little monkey, muse and mini-me), and generally creative girl with a passion for interior design!!

I am originally from Norway, and I guess my style reflects the Scandinavian sensibilities when it comes to interiors ......with a nostalgic penchant for mid-century design!

I came to the UK in 1998 to study, and ended up working in the British film industry for almost a decade making props, creatures and special effects. In fact I met my (very camera shy) husband (known simply as Mr. here on the blog) on the second instalment of the Harry Potter films.
I guess this background has made me very practically minded, and have given me the confidence to tackle just about anything I put my mind to!!

I love making things, repurposing things and upcycling things, and I get a real sense of fulfilment from creating something nice for the home for next to nothing!!

I started Nostalgiecat in March, 2013 to give my self a "kick up the backside" to put all those ideas that had been swimming in my head into action, and to make our ,then newly purchased, house ours!


Since then, both the house and the blog has undergone a quite a transformation....and my sense of style has also evolved with time!!
Nostalgiecat has gone from being a personal craft blog to a more interior and design focused site!

I see Nostalgiecat as an educational reference file of my DIY projects, that the public can refer to for tutorials and "how to's" : From basic home improvements to more creative projects aimed to add more personality to the home!

 My aim is to make creative interior design more accessible and affordable to people!
Money has been tight since I gave up my career to become a mum, and everything I do is on a very tight budget, so one of my design ethos is:
"Make the most of what you've got"
As well as posting tutorials on budget friendly DIY design hacks, I also do posts on how and where to shop the look for less + Advise on how to redecorate and improve your home when money is tight!

Nostalgiecat is still evolving as a blog, but I hope to inspire my readers to embrace some creativity in their interior design and to personalise their homes!!

If I can do it...so can YOU!!


So grab a coffee, stay a while and get lost in my creative world!!
I love to hear from you all...Any questions or comments on my projects, or even if you want to tell me about something awesome you've made for your home.... is all welcome in the comments box below each post!
I also welcome collaborations: Have you got a project you need some help with or would like to work with me on, please just drop me a line at
This also goes for interior companies and potential sponsors: If you have a product you feel would fit in here at Nostalgiecat, just get in touch....as long as I am happy that your products will be of interest to my readers and it fits in with my blogging schedule, I'd be happy to help...Compensation for promoting your product here at Nostalgiecat is negotiable!
xxx
June


Wednesday, 22 May 2013

Little miss Moo's big girls room.....

...and a fond farewell to the toddler room...


It's the end of an era..... Little Miss Moo has finally got her big girls room!this was meant to happen when she turned 4, but for various reasons we never got around to it until last weekend... and in the nick of time...she had way outgrown her toddler room by now, and was starting to get embarrassed to have her friends around, as she's a big girl now.... They grow up so fast...Where does the time go.................?
 
 But before I share her new big girls room with you all, I wanted to repost these images from her toddler room:


Little Miss Moo's room was cute, but not saccharine: The walls were painted a light mossy green.... With a lovely bed canopy from IKEA, the cot bed (that has been her bed since birth in all its shapes and forms) was from John Lewis. The (wonky) Steinlen cat prints on the wall was bought in Paris during our honeymoon....


I'd mirrored the use of bunting on the canopy in the window dressing....


.....and the "dottiness" of the fabrics are recurrent in the little lampshade light garland (Tiger tiger) as well as on the fabric covered letters (mamas and papas) on the shelves.....
I love the white rabbit night light!
The shelves are from IKEA, as is the green night light (on the wall) and the crocodile in the bed...
.....Miss Moo thinks he's great for a cuddle(still)!


Miss Moo's room is not very big, and it's was a challenge to get it kitted out for her growing needs now she's a big girl...
 
with swopping her cot bed (she was almost the length of it now....)for a big girls bed and finding space for storage + leaving enough space for play.
...we had to loose the chest of drawers she keept her clothes in....
See how I overcome this problem in the follow up post....coming soon!!
 
Miss Moo loves music, Scooby doo and witches at the moment...(I know...what a combo, right??)
But the thing she loves the most, is being "a Hex-girl": some sort of eco Goth girl band rock star alter ego....!?!
She gets dressed up in every necklace, bracelet and hairclip she can find ( watch out mummy's jewellery), apply a heavy handed dose of glitter make up then rock out with her piano or her paper jams electric guitar....


Next month it'll probably be something different....
...so the new big-girls room will have to accommodate for a variety of future interests and fads....


  I just hope she'll never get too big for all her old friends .....


   xxx
June

Monday, 20 May 2013

Here's wishing you all a great new week.....

Happy Monday!

 
Woke up to another grey Monday morning...but I am not going to let it spoil my mood......had a rough weekend, so decided last night to start afresh and positive this week!


This week I am going to do up little miss moo's kitchen chair for this week's diy project, and I will be telling you all about our plans for her big girls room...
 
Wish you all a great week!
 
 please keep popping by and leave me a message.....makes my day!
 
Xxxjune


Saturday, 18 May 2013

"Lino" printing artwork....on the cheap!


I told you this has been a busy week here at nostalgiecat...
....as well as doing the jar swag light and making the succulent terrarium, I have also been working on the nostalgiecat logo.

I created this cat many years ago, when I was studying art in Norway, and since then he has taken many shapes and forms, in a multiple of medias...more on that in a later post.

This time however, I decided to keep it simple.
I'd seen this cheepo way to do printing somewhere a while back (sorry, but I cant remember where), and decided to have a go....

.....it all starts with a pizza base from sainsbury's.....(I guess that's what we're having for dinner....waste not, want not...)


This may sound strange, but you see: these pizza bases comes with just the right packaging....you can probably find it on other things as well, but it has to be that sort of 3-4ml thick foam that is often used in food packaging.....


Turn the foam over and cut out the size you want your print to be...
...I used the glass from a frame as a template.


When you've cut your foam to shape, simply use a blunt pencil to draw on your artwork.
You want to apply just enough pressure so that you carve into the foam without going though .
Start of lightly...you can always go over again....

 Add as much or as little detail as you want, bearing in mind that really small details will probably not show up in your print. 

When you are happy with your artwork, dig out some paper/canvas and paint.
for my purposes I used normal paper, but using canvas or textured paper would add another dimension to your print. 


 Apply paint all over your template.....


Turn over and press firmly onto you paper....


Carefully peel off the template to reveal your print...


Experiment with different brushstrokes, colours and amounts of paint for different effects...


 You can even layer prints in different colours on top of each other...
.....have some fun..
Get the kids involved....you cant really go wrong....


I am pleased with how my nostalgiecat logo is coming along, and can't wait to add it to the design of my blog....watch this space!!

 This project has inspired me to dig out my paintbrushes again , and I have some big canvases in the cupboard waiting to get done.....

Thanks for looking..

xxx
June


DIY succulent terrarium


......simple indoor gardening for people without green fingers.


I have been seeing these all over pinterest for a while now, and think they are super cute!
I love houseplants, but have not exactly got green fingers, so was encouraged by the promise that these were easy to keep.
 (I have been known to kill a plant by just entering a room...OK , a slight exaggeration, but you get my drift....)
So....let's give it a go:


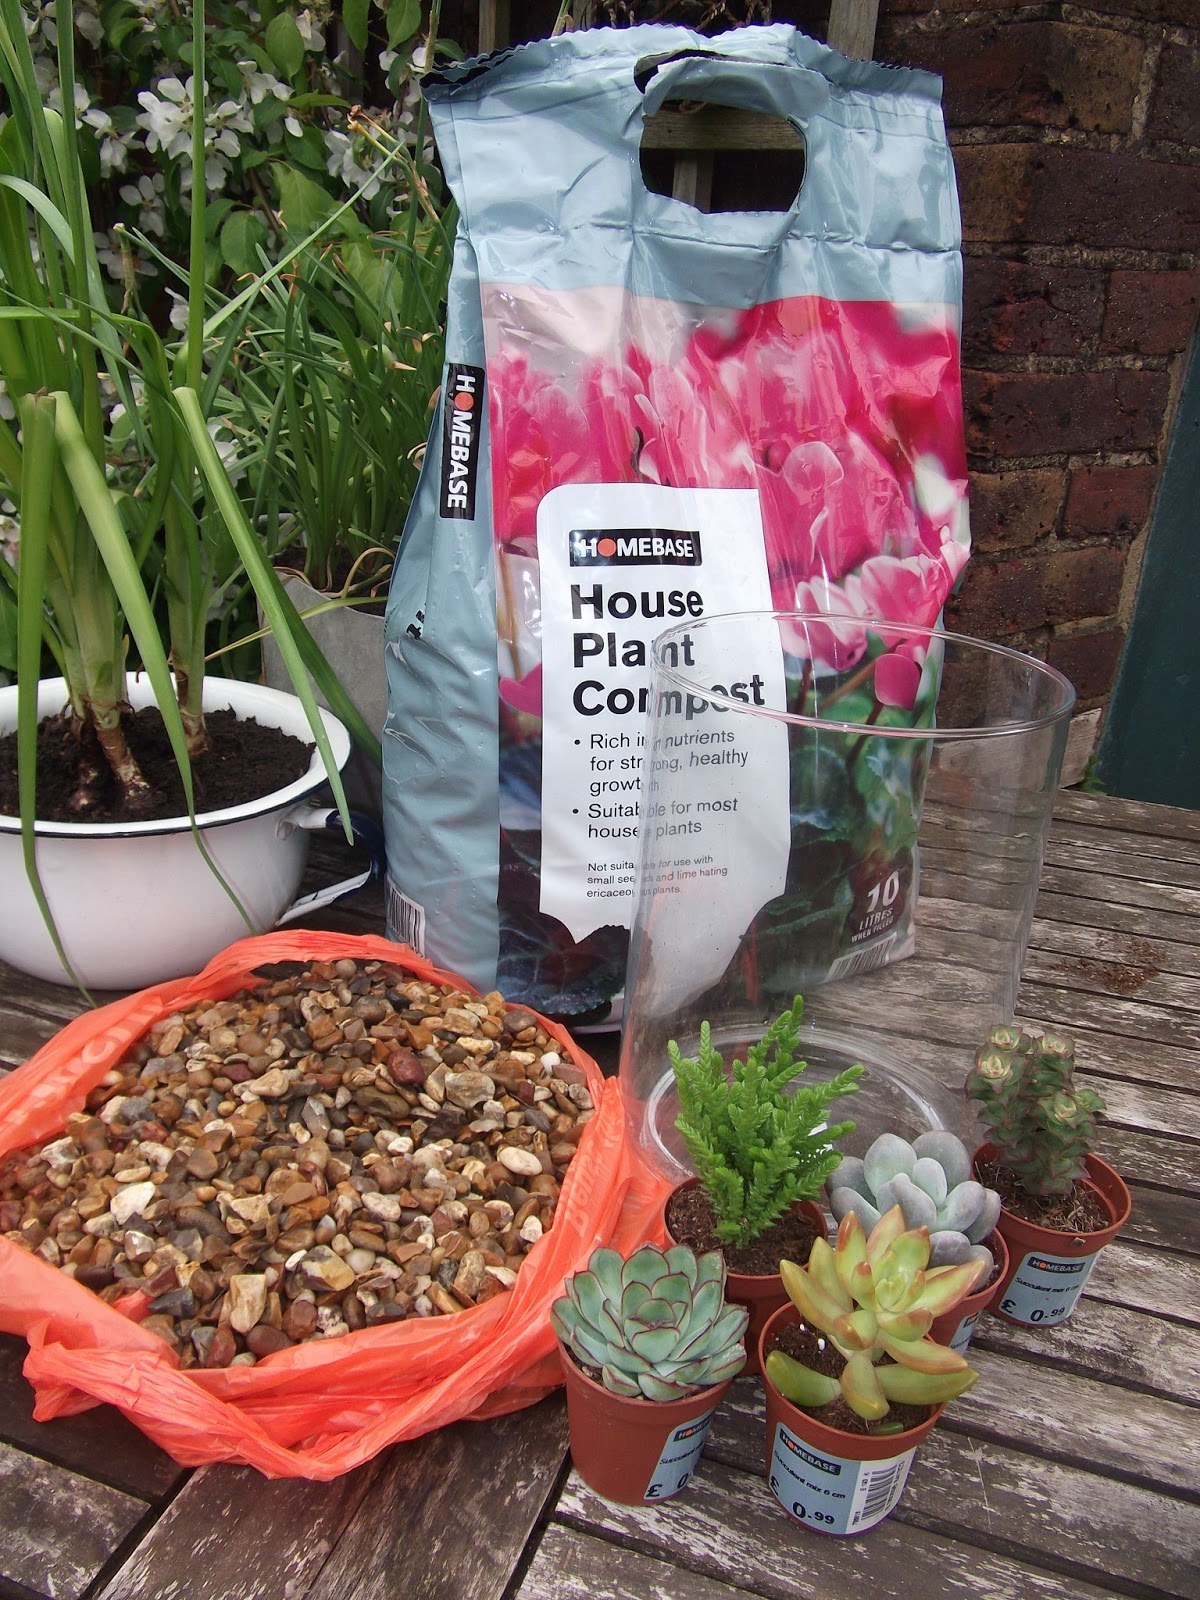
I got  a simple glass container in a charity shop for £2 , nicked a few handfuls of gravel from outside our local supermarket,
then got some houseplant compost (succulents like soil containing "peat"), £4
and a selection  of succulents from homebase, at £1 each.


Here's a list of suitable succulents:
Echeveria
Silver sprinkles
Chandelier plant
Baby's tears
Jade plant
Rhipsalis cactus
Oscularia Deltoides 

 First put a 2" layer of gravel in the bottom of your container for drainage
then add the soil
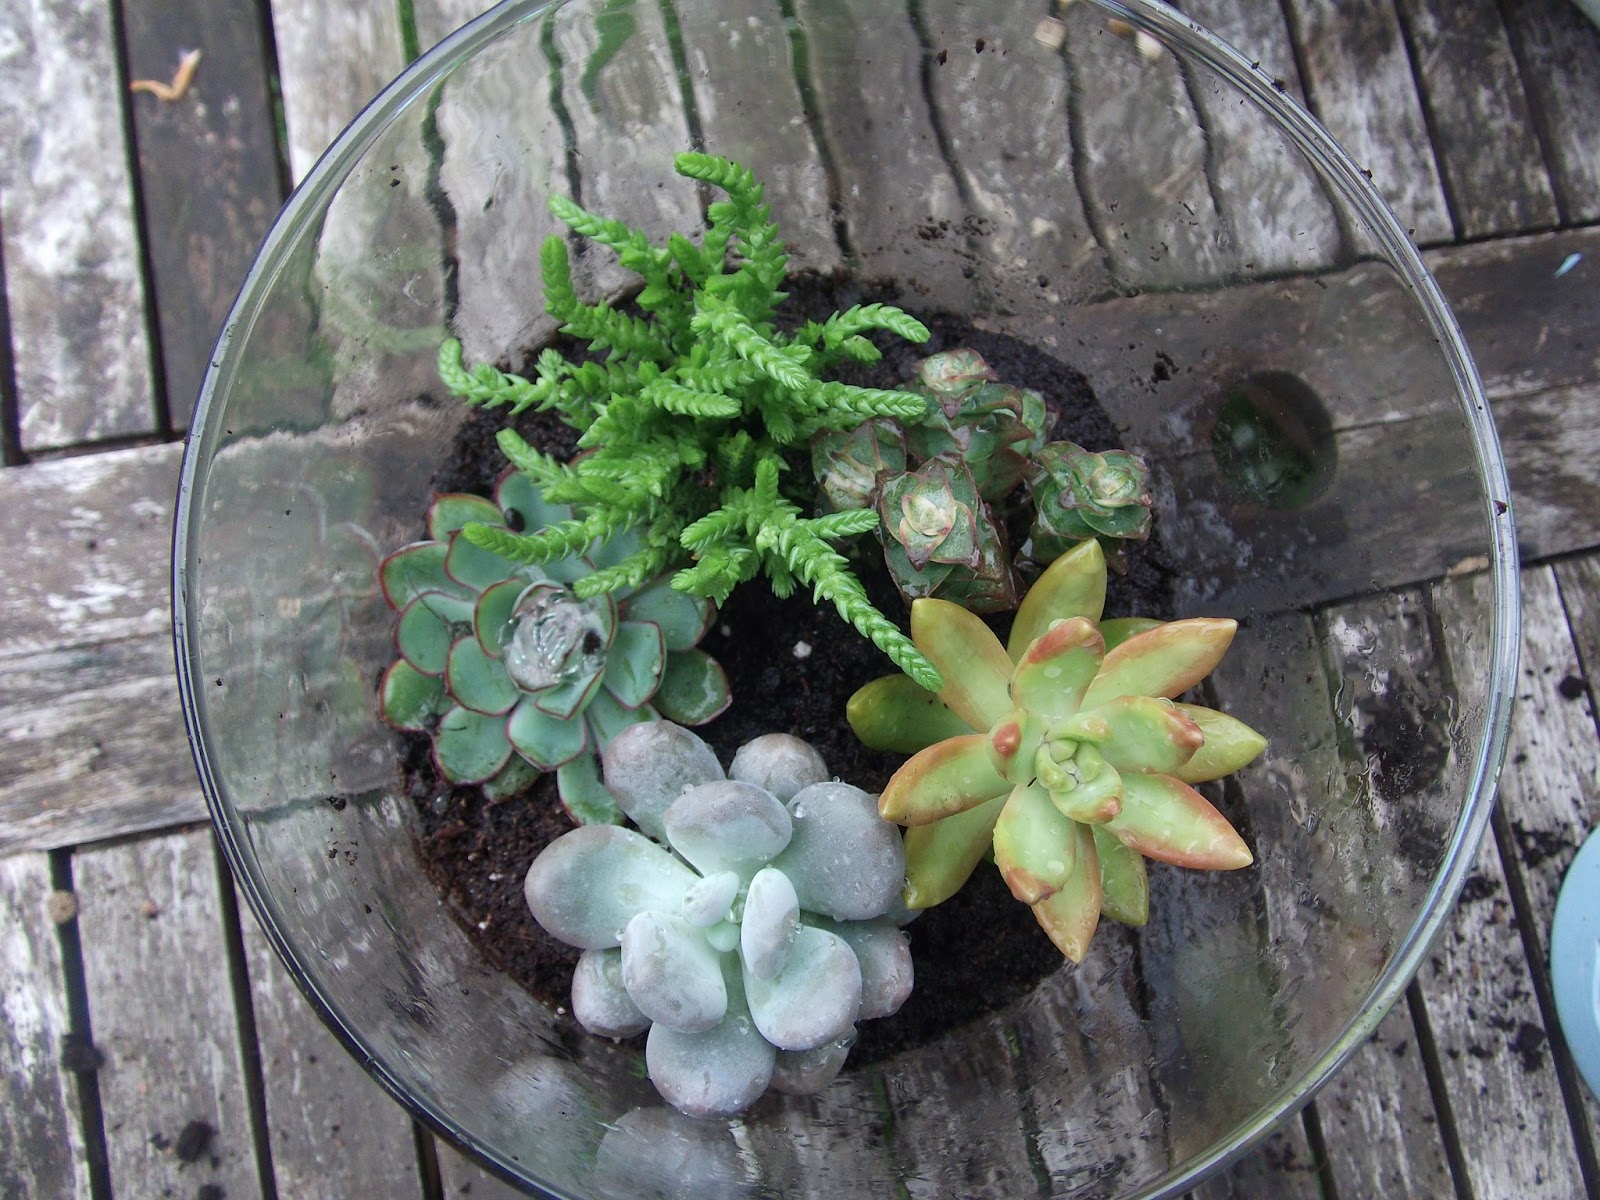
Arrange your succulents how you want them, making sure the roots are covered by the soil.
Give it a little bit of water and voila....your terrarium is finished.

Put it on a sunny windowsill...maybe group a few of them together for maximum impact. I will definitely do some more of these.....
 Part of their beauty is that they don't take much looking after..(so they say)..don't worry if you forget to water for a while...
.....also : it is supposed to be really easy to propagate succulents ......
Just cut a piece of your succulents (say when they get too big for your container), let the cut off leaves dry for 24 hours until they form a callus over where the cut was made.......
....then you can replant these in new terrariums.
I think that is what you'd call cheap and cheerful!!

I found lots of great advice on succulents at http://www.succulentsandsunshine.com


I think I'm hooked on these....so easy and cheap to make, and hopefully I won't kill them too soon...
...will be on the lookout for more interesting containers to add to my indoor garden...

xxx
June

"