
...A novice guide to wallpapering.

If you have been following along my social media or here at Nostalgiecat recently, you will know all about my excitement about my most recent collaboration with Wallpapered.
I have been doing up my spare bedroom, and wanted to create a truly personal statement wall in there.
My very talented friend , Kristine Scott, a jewelry maker and photographer from Norway, kindly let me use one of her amazing photographs of waves crashing in on the shores on the West coast of Norway, taken at Golta, near to where I am from...
(You can see more of Kristine's photography on her Flickr page, and you can find her beautiful nature inspired jewelry in her webshop.)
I then, working with the very helpful design team at Wallpapered, redesigned the image slightly, by pixilating it for a more painterly look!
You can read all about this process here and you can see the design concept I created for my spare bedroom makeover, along with some before images of the space here.
Well....it is up!!
*Throwing some celebratory dance moves!!*
And in today's post I am not only reviewing my custom made wallpaper, but also giving you a novice guide to wallpapering.
That's right: I'd never done wallpapering before....and I was a bit nervous about it!
I mean, having gone to the trouble of creating my very own wallpaper, only to mess it up when hanging it, would be less than ideal.
But, turns out: I needn't have worried!
And if I , a total newbie wall-paperer, found this easy, then YOU can do it too!
So here's what happened, and how I did it:


If you have been following along my social media or here at Nostalgiecat recently, you will know all about my excitement about my most recent collaboration with Wallpapered.
I have been doing up my spare bedroom, and wanted to create a truly personal statement wall in there.
My very talented friend , Kristine Scott, a jewelry maker and photographer from Norway, kindly let me use one of her amazing photographs of waves crashing in on the shores on the West coast of Norway, taken at Golta, near to where I am from...
(You can see more of Kristine's photography on her Flickr page, and you can find her beautiful nature inspired jewelry in her webshop.)
I then, working with the very helpful design team at Wallpapered, redesigned the image slightly, by pixilating it for a more painterly look!
You can read all about this process here and you can see the design concept I created for my spare bedroom makeover, along with some before images of the space here.
Well....it is up!!
*Throwing some celebratory dance moves!!*
And in today's post I am not only reviewing my custom made wallpaper, but also giving you a novice guide to wallpapering.
That's right: I'd never done wallpapering before....and I was a bit nervous about it!
I mean, having gone to the trouble of creating my very own wallpaper, only to mess it up when hanging it, would be less than ideal.
But, turns out: I needn't have worried!
And if I , a total newbie wall-paperer, found this easy, then YOU can do it too!
So here's what happened, and how I did it:
When my custom made wallpaper from Wallpapered turned up, I was simply overjoyed with the design...
...it was exactly how I had envisioned it and you could instantly tell that it was printed on very good quality paper.
All of wallpapered's paper s printed on 100% natural (cellulose) non-woven paper , which promises to be much more hard wearing than traditional wallpaper, as well as making it very easy to hang and more durable, with a 20 year light-fast guarantee.
This instantly reassured me, and the roll came with clear instructions of what you'll need and how to hang your wall paper, attached to the beginning of the wallpaper roll.
There is also an helpful guide to wallpapering on the Wallpapered website.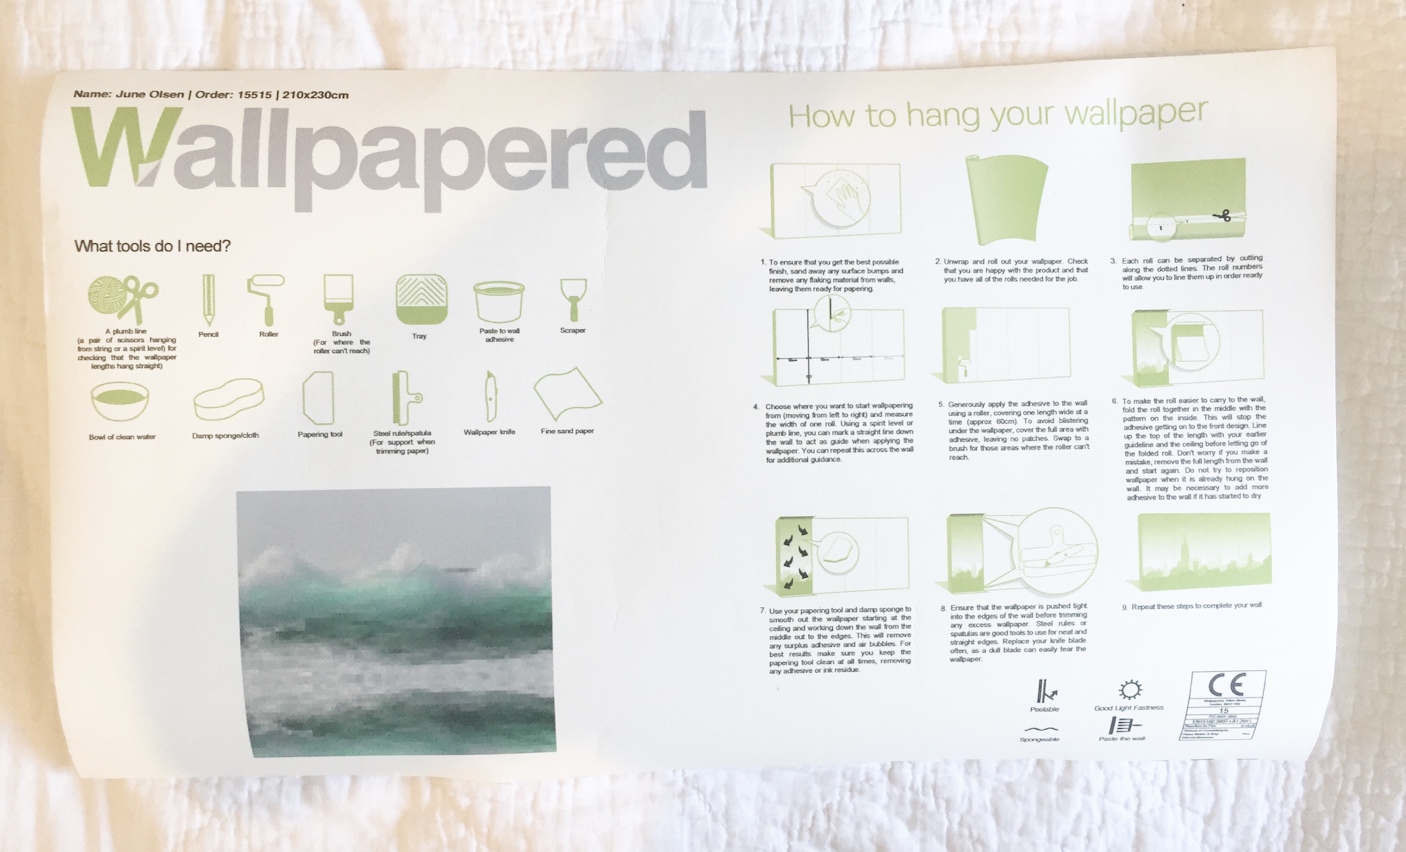
Very useful for a wallpapering newbie, like me....
Being a very practical and hands on person, I treated this as I do any other project I undertake....with considered preparation:
I carefully read through the instructions, taking notes and trying to preempt any possible problems that could occur, drawing up my plan of action.
Then I set about requiring the things I needed for the Job:

A plumb line or a spirit level for checking that your wallpaper is hanging straight.
(If you have neither of these, a pair of scissors hanging from a string will work just fine)
A pencil
A paint roller
A brush (for where the roller can't reach)
A tray
Paste to wall adhesive. I used this one.
A scraper/steel ruler
A bowl/bucket to mix the wallpaper paste in.
A stick (or similar) to mix with.
A bowl of clean water
An old tea towel (for wiping clean your hands and tools as you go)
A damp sponge
Stanley knife with spare blades
Fine sandpaper
Scissors
1/ PREPARATIONS
As always, whenever I tackle a DIY job, I pay extra attention to the preparation before starting the job. That means having all the tools I am going to need to hand, clean and ready to use.
Preparing the work area and making sure I have easy access to everything I need.
NEVER take any shortcuts when preparing to do some DIY in your home, there is a reason why the instructions are as they are:

So, first, according to instructions, I rolled out my wallpaper, and cut where indicated to separate the rolls. Then I laid the(in my case )5 different sections out flat, so that they would uncurl before hanging.
Each section of wallpaper was numbered, making it very easy to line them up in the right order ready to use.

Next up was Prepping the wall:
My wall was newly painted, so you might think that I needn't have bothered with this step, but I meticulously went over the entire wall, and sanded down any little bumps, left by the paint roller with some fine sandpaper.
Having a smooth surface made wallpapering so much easier later, eliminating the risk of airbubbles...
I wiped away any dust with a damp rag.
2 / PLANNING

What I did next is not in the instructions on the wallpaper roll from Wallpapered:
I knew I wanted to start wallpapering in the corner, so that I would be working from left to right, following the order of the wallpaper panels.
But I remember someone once telling me:
NEVER ASSUME THAT YOUR WALLS ARE STRAIGHT!
So I thought I'd check to see if the walls were straight/square in the corner using my plumb line...
....which they were not!
When hanging wallpaper it is essential that each panel is hanging straight. If the first panel is out of line, the finished result will look crooked and less than great...
....so starting off with a crooked section of wallpaper was NOT an option!
Her's how I fixed it:

Using a spirit level and pencil, I marked off on the wall where the correct plumb line should go in the corner...In my case, it tapered out from the top of the wall by approximately 1 cm towards the bottom.

Then I measured the width of the wallpaper rolls, and marked off the width on the wall from the corner by where the tapering of the wall was at its widest .
Then using my plumb line I marked off a straight line down the wall towards that point.
This will be the line which the first roll of wallpaper needs to follow in order to hang straight, and any excess wallpaper towards the corner where the walls meet, will need to be trimmed...I will show you how in a minute...
I then continued to mark straight vertical lines at intervals of the width of the wallpaper roll all along the wall.
This will give me a guideline for where each wallpaper panel will go, and work as an indicator when applying the wallpaper paste later.
3 / THE WALLPAPER PASTE

Wallpapered's premium quality wallpaper requires paste to wall adhesive, as opposed to paste to paper.
To me that was great news, as I felt more confident applying the paste to the wall: And yes, I can tell you now: It was actually really easy!
Being a novice wall-paperer I found it Easy to use and not at all messy.
I chose to use Solvite paste to wall paste, and I was very happy with my choice. It came with easy instructions and mixed in less than 2 minutes, was ready to use straight away, and kept well throughout the process.
4 / MORE PREPPING

I think the key to making wallpapering a successful and , dare I say it, enjoyable experience is all in the preparation you put in, and working neatly.....Oh and stick some funky music on ....loud!!! (Sod the neighbors;))
Have everything you need handy: Put an old towel on the floor and lay out your tools. Mix up a batch of wallpapering paste according to the instructions on the pack , outside if you can, but if not: carefully on the covered floor.
Make sure you have a bowl of clean water for cleaning your tools and hands regularly throughout the job. The last thing you want is sticky dirty hands all over your funky new wallpaper.

Also make sure you have a sharp wallpapering knife, with spare, sharp blades at the ready, along with a scraper or a metal ruler to help you fold the wallpaper in place, ie into corners, as I will show you below, for trimming off any excess.
5 / APPLYING THE PASTE

I applied the wallpaper paste with a paint roller, just as I would with paint, only ,of course, much thicker and stickier ;)
I made sure I covered the area where I , as explained earlier, had indicated where the first wallpaper panel should go, following that first vertical line I drew at the width of the wallpaper roll.
Only apply paste to the area of one wallpaper section at the time. this will make for a less sticky experience...

Along the ceiling line, in the corner and down by the skirting I used a brush to apply the paste, so as to keep the working area as clean and tidy as possible...
6 / HANGING THE PAPER

To make the wallpaper rolls easier to carry to the wall, fold each section together in the middle with the pattern on the inside. This will helped keep the front design of the wallpaper clean from adhesive.
I lined up the first wallpaper section with my earlier guideline, before letting go of the folded roll.
If you make a mistake, don't worry: Simply remove the full length from the wall and start again.
DO NOT try to re-position the wallpaper when it is already hung on the wall, as you might rip it. Instead reapply some more adhesive if necessary and start again.
Using the papering tool (seen in my back pocket in the image above, I gently smoothed the wallpaper onto the wall:
Starting at the ceiling and working my way down the wall from the middle out towards the edges.
This helped remove any excess wallpaper adhesive and air bubbles from underneath the wallpaper panel.
Try to keep the papering tool and your hands clean at all times, wiping away any adhesive or ink residue regularly.

Then, using a damp sponge to smooth over the wallpaper surface, wiping away any excess adhesive on and around the wallpaper section, I ensured all the edges of the wallpaper were flat to the wall.
7 / TRIMMING THE EDGES

Using the wallpapering tool , I ensured that the wallpaper was pushed tightly into the edges of the wall towards the skirting and ceiling, but also towards the corner where the two walls met, where I pushed the excess wallpaper (left over after making the first panel hang plumb.) into a fold.
Then using the scraper tool as a cutting guide, I simply trimmed away the excess with my Stanley knife. This helped create a neat, straight edge.
Use this same technique to trim the wallpaper along the ceiling and skirting, as well as around any light switches or similar.
Make sure you change your knife blade often, as a dull blade can easily tear the wallpaper.
8 / COVERING THE WALL
Here's a little stop-motion video I've made up of the process of hanging the wallpaper.
(Excuse the bushy hair and the occasional knicker flashing ;))
Repeating steps 5 and 6 I continued to hang the wallpaper panels all along the wall, trimming along the ceiling and skirting (and around the light switches etc.) as I went....

Using the edge of the first panel as a guide, by butting the next section of wallpaper tightly up against the previous... (After this job, it's time for a manicure, don't you think??)

...until I reached the end of the wall (In my case the wallpaper ended by the door frame).
After using my wallpapering tool to ensure the wallpaper was pushed tightly into the corner....

I used the the same technique, as described above in step 7, to trim the last panel of wallpaper along the frame of the door. Then I simply used a metal ruler as a guide to make a straight cut where the wallpaper ended before that little wall area above the door...

And that's it...done!
I was surprised at how easy I found it to do.....as well as how quickly I did it!
I started the prep at 9 in the morning, and was finished at 1 o'clock!

I loooooove my new wallpaper!!
It's difficult to capture it properly in the photo's, but I love the way is changes: Up close it looks painterly and intriguing, with all those pixiliated squares in various shades of greens and grey's ....but step back a bit, or squint, and that amazing photograph, taken by my friend Kristine, of the waves crashing in on the shore of the west coast of Norway, reveals itself!

I am really so pleased with how it's turned out!
The design team at wallpapered has done an amazing job in realizing my vision of this wall paper...
...and I also have to say that the entire process, from design to finished article has been very enjoyable. Not to not mention how easy I found the actual installation of the paper itself.
If you fancy making a statement in your home, by creating your own, personal and unique wallpaper from a photograph, I would highly recommend that you use Wallpapered's create your own wallpaper feature, to upload your own image and have it custom printed to your exact wall size.
Imagine the possibilities!
That lovely holiday snap, or that perfect Kodak moment shot of your child....covering an entire wall.
Talk about personalizing your interiors....or making a statement!
You can create your own wallpaper here!
So what do you think of my design?
I will reveal the new look spare room, in it's entirety, in my next post, so be sure to pop back later this week to see how this wallpaper works in my room design!

 |
| Please vote for me for best DIY blog |







