Sunday, 24 August 2014

Our new work/play space in the loft

reveal...
Summer is nearly over....Boy does time fly!! We are on our usual "last of the summer" break in Norway at the moment...its becoming a bit of a tradition! And we'll be here until the penultimate day before its time for Little Miss Moo to get back to school!!

Its a good thing then, that we managed to finish turning our messy ,dumping ground of a loft into a work and play space, where LMM can sit and do her homework and play with her friends..... and where I can retreat to do my projects and blogging....saving our "new" kitchen from the mess of my creativity!!


So, here's what the Loft used to look like!!
It really was a mess!!
It took me, and my little "helper" 2 days to clear the mess and get all our stuff organised in the eaves....


With that done, it was a case of giving our damp damaged walls a lick of paint (more on that later...), and lay down some new flooring,( I chose to put down cork tiles, as I wanted a floor I didn't have to be too precious about...this is after all supposed to be a functional work space...besides : they were cheap!!) before I could implement my new work space design....


....and I hope you'll agree:  The transformation is quite remarkable!!
It is now a very functional space where we can all spend time: For both work and play!!


I made the double desk going all along the far wall from a piece of laminate panel from  Wickes and some Oddvald trestles from IKEA, and it's perfect for the space!! Little Miss Moo can sit and do her homework whilst I do my blogging work, allowing us to spend time together at the same time as we can get on with our own stuff!! 


...and its also perfect for when little Miss Moo has friends around, as there is plenty of space for everyone to sit and do some drawing or crafts...


And keeping all our craft and art supply's handy in an IKEA Raskog trolley is a great way to promote creativity! 
If you like the "I will survive" plant basket, I will share the stencil template with you all soon!


I love how the painted brick wall turned out....and on one side of the desk, I've created a little collage of inspiring pictures and some black and white family pics...I love the "Don't grow up...it's a trap" washi tape from Tiger...


I've also, true to my plan of introducing some more plants into our home, added a couple of succulents (they are easy to keep!) I've made the paper plant pots myself, and will show you how in my next post!!


I've used my jazzed up natural basket from Bodie and Fou as a bin...I just placed a cheap paper waste basket inside!


I used a couple of Ribba picture ledge's from IKEA to display some art work, above the desk.


And on the other side, I've created the perfect spot to sit and do my blogging!


I've used my new House Doctor vases to house my pencils and brushes, and my new faded clipboard from An Artful life studio to display current projects...The textured wall hanging is an easy DIY I will show you very soon!
Also note Little Miss Moo's artwork, proudly displayed on the picture ledge above!


The Ranarp spotlights are also from IKEA, and I love the hint of industrial feel to them! 
The space underneath the trestles is perfect for my hoards of interior magazines...I've simply screwed a piece of wood to the base to create a shelf there!
And the old filing cabinet has also had a makeover with some DIY stencils, that I will share with you all very soon!


I purchased this futon on e-bay for £20....


...creating a nice place to relax with a magazine and a cup of coffee!


The "side-table" is just a big storage basket with a tray placed on top, making it  very functional, as I can simply carry my refreshments up to the loft on the tray, and place it on top of the basket, which also obviously provides useful storage for odds and sods...


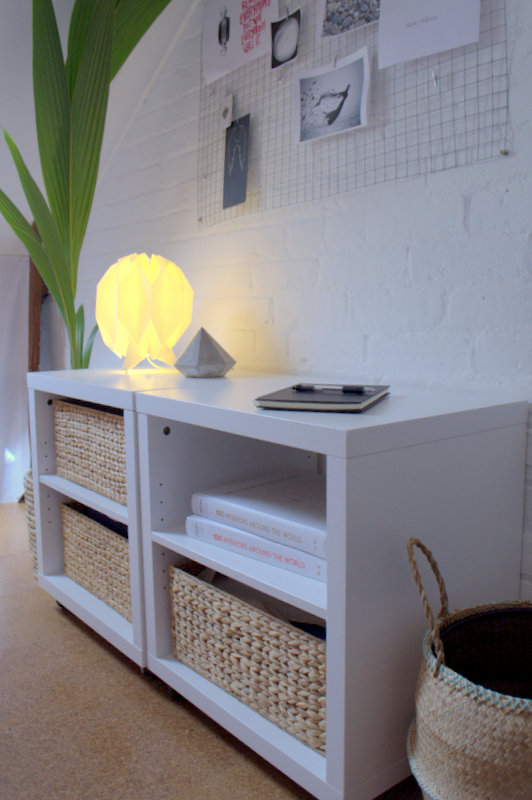
Here's the view from the other side of the room, with my old upcycled bedside tables, now used as storage for papers and other office essentials, like the printer...and of course my DIY wire mesh display wall where I can hang up inspirational pictures  to create my mood boards !


I already had the wicker storage baskets, and as luck would have it, they were a perfect fit for the bedside tables! 


The origami paper table lamp was a bargain in the sales from habitat.
And of course, Arthur - the plant ,fits perfectly in this spot to add a lush touch of green!!


Already this "new" room in our house is improving our lives...We spent most of the time up in the loft in the few days we had before flying to Norway....Little Miss Moo would just disappear up there and I'd find her getting creative with either drawing ...or in this case: some balls of wool:


And that in itself means that I can get on with my own stuff as she now knows where all her art supplies are, and that she can go upstairs when she feels like it, and get creative!!

This is possibly the best improvement I've made to our house so far!!
Its a fun and creative space, a retreat where we can get messy (both LMM and me!!) without having to pack everything away at the end of the day!!
And it also looks great...I hope you'll agree!!


Just goes to show, with a little effort, a small amount of £'s and a bit of imagination, using the spaces in your home to it's full potential will improve your lives, as well as your home!!


https://www.blogger.com/blogger.g?blogID=5334983011637438110#editor/target=post;postID=8284451819364864907;onPublishedMenu=posts;onClosedMenu=posts;postNum=18;src=link
Please spare a minute to vote for me for best diy blog in the Amara interior blog awards (click on the image below)

amara interior blog awards

Friday, 22 August 2014

Wire mesh memo wall DIY


Today I am sharing this detail from my new work space: A wire mesh memo wall!
I know you can buy these purpose made ones, but I just bought a galvanized mesh panel from wickes* for £3.99...


I simply suspended it on the wall with 4 screws...


Perfectly simple....and great for my ever changing mood boards!
I just use some mini pegs* (I sprayed mine silver) to pin up pictures and notes.

I find that having an area designated to inspiration is inductive of my creativity, and a great way to keep myself organised and focused!!

How do you stay organised and inspired in your work space??


*affiliate links: I may make a small profit, if you deside to make a purchase though this link!


Wednesday, 20 August 2014

How to: Paint laminate furniture

In turning our loft space into a work space/ office , I am , as ever, on a tight budget!!
So making do with what I already have is essential!!
Having said that, this is not going to stop me from achieving the look I am after (See my previous post here)


An essential part of a working office/work space is storage....but I could not afford to go out and buy new, so I've transformed these old laminate IKEA bedside tables that we already had to fit in with my work space design!! Other than being that fake birch wood look , they were perfect...especially as they already had castors, making them easy to move around. All they needed was a lick of paint!!

Painting laminate furniture can be a bit of a disaster, if not done properly....
....so in this post I am going to show you how to get a lasting and good-looking finish when painting laminate!!


The rules for painting Laminate is slightly different from when painting real wood:
You cannot key up the surface of laminate, as you would with wood, by sanding the surface.
But you still need to prep the surface in order for the paint to grip and not slide straight off.
The key to achieve this on Laminate furniture, is to thoroughly clean the surface:
Use a cleaner with de-greasing purposes : I've found that a regular cream cleaner does the job.
Rinse and dry the surface after cleaning!


The next step is THE MAGIC INGREDIENT!!
Get some Polycell liquid sanding solution* . This will help key up the surface, making it more receptacle to paint!
(*This is an affiliate link: I may make a small profit if you decide to purchase this product !)


Simply wipe it on with an old cloth, leave to dry for 10-20 minutes, then clean off !
You will notice that the previously smooth surface of the laminate now feels slightly rough to the touch!


Before you can paint your laminate furniture, you will need to further prep the surface by painting it with an oil-based primer! This will create a bond between the laminate and the paint, making the finish more durable!!
 It CANNOT be a water based primer, as this will simply not work!!
Any oil-based primer will work, as will a product like Stain stop*, which is what I used!
*affiliate link


For a smooth finish, roller it on with a sponge roller...
Don't worry about an even coverage at this point...you are merely creating a bond for the paint to grip on to!


When the primer has dried, you can paint your laminate furniture with ANY paint you'd like: emulsion or gloss...it doesn't really matter: If you have prepped the laminate properly, they should all grip nicely to the surface!!


I chose to use gloss paint!
I rollered it on with a gloss roller sleeve! 
I did 2 coats to achieve an even coverage!!
(If you are painting something that will have to withstand a lot of wear and tear: Like a table top, I would recommend that you finish off with a coat or two of clear varnish)

And that's it: My old laminate IKEA bedside tables has gone from fake wood look to glossy white!
And now you know how to properly paint laminate furniture with a lasting finish!!
(of course you can be more adventurous with your color choice than I have)
Using what you've got, and updating furniture with paint, is one of the best ways to save money when updating a room! See more of my tips on decorating on a budget here and here


It fills me with a great sense of achievement when I can make do with what I've got and still create the look I am after... The new work space in the loft is nearly there now...Just a few little creative touches left to do, before I'm ready to show you all!!
And just in the nick of time, as we are off on a little break to Norway tomorrow!
Time flies! (is it just me or does time go faster as you get older??)
Enjoy the last of your summer folks!!

Oh! And if you have a spare minute or two, please vote for me in BEST INTERIOR BLOG CATEGORY in the COSMOPOLITAN BLOG AWARDS!
Voting closes on the 29th August, and I would really appreciate your support!
Click on the image below to be redirected to cast your vote (Page 11)
Thank you!!


Saturday, 16 August 2014

5 inspirational office spaces

Image via finn.no
The last couple of weeks me and Little Miss Moo have been busy working on turning our messy dumping ground of a loft space into an office/work-space/playroom...
With LMM starting year 1 in September, she needs a place to do her homework, as her room is too small for a desk....but more selfishly, I wanted to create a work space for my self: Somewhere I can get messy with all my projects (so I don't mess up our NEW kitchen, which has been my little hub up until now, and somewhere I can retreat to , to write my blog posts in peace and quiet (NOT on the sofa with Scoobie Doo blaring on the telly...like just now!!) Also somewhere we can all go to just hang out... So I've been spending a lot of time on Online looking for inspirational work spaces/ offices recently...
Today I want to share my top 5 most inspirational images:
#Top image is from a friend of a friends home in my hometown of Bergen, Norway, The entire house is just dreamy, but I particularly love the simplistic and rustic look of this work space: The use of old apple crates as shelves on the wall is inspired, and the framed child's drawing is soo cute.... And I lust after that filing cabinet!!
Norwegian blogger Elisabeth Johansen from pure interior has created this little working paradise.
I love the long desk with space for several, miss matched chairs: Ideal if LMM has friends around for some craft time... I also adore the wire mesh mood board on the wall: I may have to DIY one like it!!
 
Amalie Fagerli of the Norwegian blog Svenngaarden 's workspace is almost opulent.... yet functional, with the use of gold and metallics throughout! I love the gilded ornate frame used to display her mood board /images and the lushness of that green palm!! I also like how she's created a narrow shelf above her desk to help free up some desk space and keep it clutter free!


This space from blanaid is very close to what our loft space look like, with the slanted ceilings on either side, and I love the idea of the trestle bench along that wall and the way this lay out gives enough floorspace for a seating area and a rug on the floor where LMM (or me) can play !


My last picture of an inspirational work space is this one, found via vtwonen. Unfortunately I cannot find the original source, but it is obviously Scandinavian: Just see that lovely map of Scandinavia on the wall...I want one!! I love the monochrome and airy look in this room, but what really caught my eye, was the flooring: The sort of floor you don't need to worry if you spill some paint on....This work space is for creating in!! I also love the use of casters on the storage units, making them easy to move around to change the space!!


Follow along in the next couple of weeks to see how elements of these inspirational offices will be implemented in my redesign of our loft into a work space...
There will be some practical how-to's, some easy DIY's and some more creative and decorative makes ....and of course: the big Reveal!!


Thursday, 14 August 2014

AN ARTFUL LIFE


Last night I had the pleasure of meeting Kate from An Artful Life at the opening of her London pop up shop at the Folly!

"An Artful Life studio and shop was set up by Interior Architect Kate Whitfield. Kate designs and sources creative items that are beautiful, imaginative and on-trend to help customers create their own stylish environments to enjoy spending time in.
The eclectic collection is constantly changing and being added to. Many items are one-off vintage finds, some adapted, or hand-crafted in the studio, others are new and chosen for their beauty and modernity."*

*extract from the AAL website

Vintage school chairs, customized by An Artful Life Studio's
This was a first, for many reasons for me: my first experience of a pop up shop, my first face to face meeting with someone I've got to know through "blogworld"...and my first night out, solo, since having little miss moo!
And I must say: I picked a good one! 

Wooden stool with painted legs by An Artful Life Studio

In a relaxed atmosphere at the beautifully, trendy the Folly bar, Kate's collection fitted right in...and that themed with her friendly demeanor, made this nervous, small time blogger feel at ease straight away! Of course it helped that her collection of upcycled furniture and handmade home accessories  pared with handpicked items from a variety of designers, is right up my street!
CUBE cushion from A MIND'S EYE
In fact: if I could, I would fill my home with her collection ....and it would be so me!

So I felt at home! 
(albeit a perfectly styled home...filled with things I love,  heaving with stylish, merry people, where I was greeted with a glass of champagne!!....so, nothing at all like my real home then.....more like the home of my dreams!! LOL)


I adore the creative initiative Kate shows in her collection: Handmade macrame planters, upcycled wooden candlesticks, made from a vintage set of children's building blocks and hand painted retro furniture, from An Artful Life Studio, sits in perfect harmony with graphic print cushions from a mind's eye and hand picked home accessories from established interior lines, such as House doctor...All beautifully supplemented by original artwork, such as the Angela Morris-Winmill canvas below,  and modern prints from smaller graphic artists, like Letters on Love.


Kate's online shop is just bursting with eclecticism and original and unusual home decor....and I am pleased to tell you: All at affordable prices!!
Kate has certainly got an eye for not only aesthetically pleasing , modern design, but also for quality craftsmanship...something that shines through her collection!
So if you are after something a bit different for your home, I would highly recommend that you check out An Artful Life...not only will you be supporting the very talented Kate Whitfield in these early days of setting up her new business, but you may also find, and support THE next big thing in design, before they hit the mainstream!!

Here's my picks from her collection, for our new office/workspace (more on that coming soon...hint hint!!):
 From top Left :
Geometric make-up bag £4.50
Wooden stool with painted legs £130
White fade clipboards, set of 3 £17
"it always seems impossible..." framed print £36
Set of 3 wooden trays £15
Vintage wooden filing cabinet £150
House Doctor vase with handle £18.50
Vintage school chair £47

Of course, I didn't come home from my night out empty handed....here's my loot:


As mentioned above, I probably would've come home with half her shop stock, was it not for an annoying lack of money and arms for carrying!! (I did try my luck with a scratch card  earlier in the day, but with no luck.....as for growing more arms: No chance!! (Maybe for the best, that last one....??)

This is NOT a sponsored post, but an honest appreciation for Kate Whitfield's taste in home ware design, and a big respect for her talent and aspiration!! 
I wish you the best of Luck with An Artful Life, Kate....you deserve it!!
(OOOh ...I sound like such a fan....(which I totally am!!)

Go on...
Check out An Artful Life folks!


Monday, 11 August 2014

Create some uplifting DIY artwork....

...to set yourself up for a great day!


If you follow me on instagram, you will have seen this before....but today I want to share a simple and easy way to create some art for your walls!

All you need is a canvas, some blackboard paint and chalk...
Click play on the video below to see how easily you can create this...


Find a nice uplifting quote, and hang it in your bedroom so it's the first thing you see when you wake up, like I did, to set you up for a great day!!


I was struggling to work out what to do with this big empty wall in our bedroom, but this fits perfectly!!
I love it!
Of course you can change the writing at any time by wiping the canvas clean...
(Oh ....and meet "Arthur", our new family member...yes, I'm talking about the plant!!)

I am posting this early this week, as I am very excited to be attending the opening of the talented Kate Whitfield of An artful life's pop up shop in London this wednesday...I will tell you more about her and her new collection later in the week!!

Wish you all a great day....
...and remember:
Choose Happiness!!


"