Friday, 4 December 2015

Five of the best Christmas decor DIY's from the web

A guest post by Old Fashioned Susie

Hi!
I've got a treat for you guys today!
Whilst I busy myself sorting out my life at the moment, today's post is a guest post by the lovely Susie from the fabulous blog Old Fashioned Susie, where she's rounded up her favorite Christmas DIY's from the web!
And I must say....it's like I could've picked them out myself!

Anyway, I'll  let Susie introduce herself and the amazing festive DIY's she's picked:


Five of the Best Christmas Decor DIY's

Hi I'm Susie from Old Fashioned Susie and today I'll be sharing with you my favorite crafting ideas for the upcoming festive season. I've found the best ones so you don't have to trawl through Pinterest like some crazed Christmas fiend. My blog is a mix of lifestyle and interiors with vintage thrown in for good measure. Hope you enjoy my Christmas Craft Picks!

Whether you've got kids at home or not, adding the handmade touch to your home at Christmas adds a real personal element, and I especially love the fact that whatever you make can then become a keepsake or mini Christmas tradition.
Image from Country Living
First up are these adorable salt shaker snow scenes! They would make excellent place markers at festive dinner parties or just a cute way to Christmas up a shelf in your kitchen. These are like little snow worlds and you could really let you imagination go wild if you find some miniature characters to add.


Image from Womansday
This straw burst wreath looks really striking but is actually a really simple DIY. I'd try it with multicoloured paper straws too. This one could also be resized to make smaller wreathes perhaps for the tree.

Image from Villa Lisa
Who wouldn't want this Pom Pom wreath in their home at Christmas? I love this because, in theory you could add to it each year, or get the kids to make the pom poms... I think this could be one decoration that could be a heirloom piece too. There are lots of versions of these online so find one you like and can follow- finally a great excuse to buy wool! 

Image from Snug Studio
I seem to have a thing for the cute this year, but this mini critter advent calendar is adorable! And not just for kids... I found loads more here

Image from Make it-Love it
Lastly pine cone decorations, incredibly easy. Don't forget to pop your pine cones in the oven first though to get rid of any insects hiding inside. These could be customized even further with name tape as ribbon, or spray painting the cones really bright (or Christmassy) colours.

Great ideas here, don't you think guys?
Thank you so much Susie for guest posting on Nostalgiecat.
Make sure you all visit Susie's blog to check out more of her festive blog posts!


Wednesday, 25 November 2015

When your heart's not in it...


Hi guys!
I've got something to tell you all...

This post has been very difficult for me to write... in fact I've lost count of how many times I've started writing it, only to discard it and start again...
There is no easy way to to say this, so I guess I'm just going to have to say it:

There is a BIG change coming...

For those of you that know me personally, or have been following me for some time on social media, you've probably sensed that something's up in my personal life...
Well....It's a biggie:

The last year and a half has been really tough , and without going in to too much detail, things are not working out for me here in the UK on a personal level.
It's been an accumulation of things...circumstances no one could ever predict, illness, struggles and emotions....it's all been too much. And it's affected my health and happiness to the point where I thought I could not go on...
So I've made a decision...the toughest decision of my life: 
To end my marriage and relocate to Norway!


I've been heartbroken for so long now, that finally making this decision feels like a step towards regaining some control over my downward spiraling life...

I am not going to try to justify my decision, just know that I've got to the point where I could see no other option:
So I am leaving the UK...life as I know it, my marriage, my husband, my best friend for the last 17 years of my life...the life we've had together and the home we've built for our little family...Everything I've worked for....


So this Christmas me and Little Miss Moo is moving back to Norway...to start again!
I'm not going to lie:
I know it's going to be tough on us all:
Living with my mum and Dad again, at the age of 38, a single mum, no job, no house....nothing...I'ts not exactly how I envisaged my life turning out....But I really feel like this is the right thing to do for me....and for Mia , at this point...and I know that with the support of my friends and family back home: I CAN DO THIS!!
Mia will be starting school in Norway in the new year....It's not going to be easy for her: She doesn't speak any Norwegian (One of my biggest regrets) and no doubt she'll miss her old school friends, her home and most importantly: Her dad...her hero!!
But it's going to be toughest of all for my husband....to be on his own, without his little girl greeting him when he comes home after work each day...
After more than 17 years together, it is heartbreaking to think about....and even though the decision has been made, I still think to myself : HOW CAN I DO THIS??


But too much stuff has happened, stuff that's been no-ones fault....a sad set of circumstances,  and it has changed the dynamics of our relationship...to the point where there is no going back...

So as much as I struggle liking myself at the moment, for what I am about to do, at the very least I am true to my feelings, honest and willing to take the fall for my decision... 
And as unfair as this situation is , for everybody, at least I am giving us all a fair chance of something real....a new start and a chance to make it right!
I don't want Mia to ever think it's OK to settle for anything less than Happiness, and by doing this....this HUGE BIG THING....I am hoping to set an example for my daughter: To always follow your heart and go for Happiness!!
(Even when your heart is broken and happiness seems an awful long way away...)


I truly believe that if you don't like what you're doing, how you're feeling or the way you're life's turned out:
MAKE A CHANGE!!
DO SOMETHING!
CHASE THE DREAM!
    BELIEVE THAT YOU CAN!

At least that's what I tell myself....

So...
I don't usually get this personal here on the blog, but I thought you all should know what's going on...
Because, I am going to struggle keeping up with all the blog stuff in amidst all the stuff going on and the things I need to get organised in the next couple of months....with the move to Norway and settling into our new life there.
So please bare with me in this difficult and highly emotional time...I am planning on keeping up with the blog, but posts may be a bit sporadic, and I may have to take some time out over Christmas and the new year....

But here's the exciting bit:
Imagine all the new and wonderful adventures I'm going to be able to tell you all about once I've landed on my feet in Norway....
House-hunting, decorating, Scandinavian decor, furnishings and trends....Exciting new collaborations....Not to mention : Lots of new DIY projects!!


So, please bare with me, and wish us luck in our new adventure in Norway....I will keep blogging, with a little help from some awesome blogger friends of mine.... until the BIG MOVE, but then I may go quiet for a while....Don't forget me....
I'LL BE BACK!!
All images via Pinterest

Monday, 23 November 2015

6 super simple last minute DIY advent calendar ideas


It is less than a week until the 1st of December....Can you believe it!??
This last month of the year can be very hectic, and the pressures, anticipations and preparations for Christmas can soon become overwhelming. But Advent time can also be a lovely time to re-assess and slow down, and I hope you all will find some time to enjoy it!
One of the things I love about this time of the year is spending the darker evenings getting creative and making things for our holiday decor...and it always starts with the essential ADVENT CALENDAR.
Don't get me wrong, those generic supermarket chocolate advent calendars serves their purpose, but I like to create something that is a bit more of a feature in my home decor to set the mood for the season...and every year I do something different: You can see last years kirigami advent calendar here, but this year I've made This simple alternative.

It really doesn't need to be anything complicated, as the simplicity of the ideas in this post will show you....I love the idea from My Scandinavian home, above, where notes, simply taped on to a blackboard wall, with clues to a hidden present in the home will not only encourage a fun daily game of hide and seek, but also help take the pressure off having it all ready on the 1st of December....

As mentioned in before, this year I am taking a very simplistic and laid back approach to my Christmas decorating, and all the ideas for an alternative advent calendar in this post reflects this.....They are all very pretty, but also pretty easy to make, so that YOU can still find the time to create your own before December....

This idea from Arrow House is as simple as attaching 24 small drawstring bags to some strung up Large wooden beads....Stamp or draw numbers onto the bags and add some fairy lights to set the seasonal mood...


I love this simple idea from MINIKUNST: Just drill 24 holes in a piece of wood, then write little life affirming or inspirational notes on small pieces of paper, roll up and place in the holes....


It doesn't get much simpler than this idea from Annaleena's hem : Wrap up a little treats in white paper for each day of advent....stamp or draw on the numbers then simply tape them all to the wall....


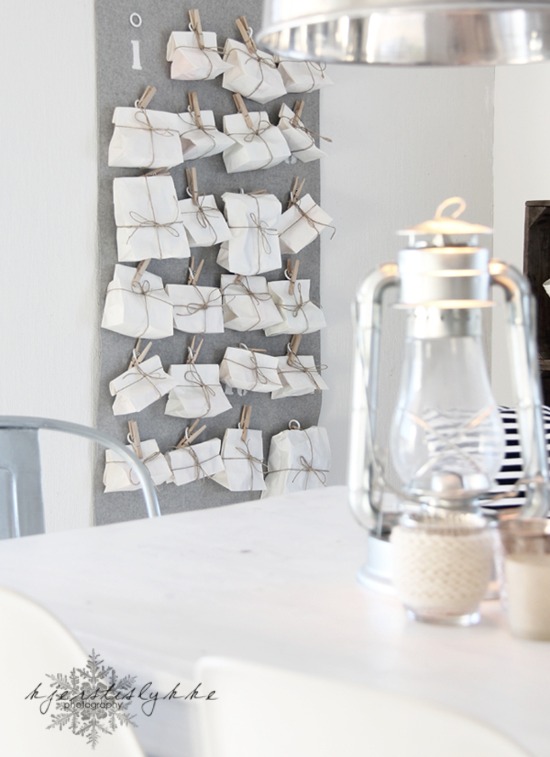
Kjersti from Kjersti's lykke also used the simple white parcel for each day approach to her advent calendar, but she attached them to a piece of numbered grey felt....and most ingeniously filled her parcels with pieces of play mobile set, so that each day her son could add to building the kit...


This last one, from Stipje, may not hold any surprise treats, and may therefore not appeal to children, but for a stylishly adult way to countdown to Christmas, I love it....
A simple twig with painted numbers , add some wooden beads on elasticated string, then move the beads up the twig as the days pass...

Wednesday, 18 November 2015

Supporting Oxfam : Advent calendar box for Parcelhero


A few weeks back I jazzed up a plain wooden box for a very good cause...
Oxfam and parcel hero have this year collaborated with 24 bloggers, myself included, to produce an advent calendar unlike any other...

and this is my contribution:


All us bloggers were given a plain wooden box with the instructions to customize it , in any way we liked, then add a little handmade gift to go inside... The idea being that each unique box would be part of an advent calendar that is being auctioned off to raise money for Oxfam's work to help end poverty on their e-bay page.


"We will always act, we will speak out, and we won't live with poverty"

Oxfam works tirelessly all over the world, tackling the root causes of poverty with the aim to help enforce life changing solutions and with the goal to end extreme poverty within 15 years....
But their work also has an impact a bit closer to home, where one in five of the UK population lives below the poverty line...
And in the time running up to Christmas the issue of poverty can sadly become even more apparent, and for families living on the breadline, the jolly season can become an even harder struggle to keep up with essential bills... Oxfam works to help these families and individuals, and the money raised from the auction of the Advent calendar will be much appreciated:

A word from Peter Hall at Oxfam: 
“A massive thanks to the Parcel Hero’s blogging community. Your creations will help change lives. We are so impressed with the amount of effort and creativity that has gone into the calendar boxes. Let’s hope they raise loads of funds to help Oxfam end poverty sooner! Happy bidding!” 


Of course my entry is in true Nostalgiecat style, with geometric shapes, a touch of copper and a handmade origami tree decoration inside...


I am so proud to have been a little part of this project, and alongside all the other fabulous entries from some fantastically creative bloggers, we all hope that someone...maybe YOU ....will put in a good bid to win this extraordinary advent calendar and help this worthy cause...


To see more of the other entries from my fellow bloggers, and even a few sneaky peeks inside some of the boxes, head to the Parcel Hero Blog, where you can also read a little more about the project....

And if you're feeling charitable...or simply lust after an advent calendar with a difference, do put in a bid for the whole shebang on the Oxfam E-bay page....

The auction will close on the 26th of November!
Thank you and happy bidding!

Tuesday, 17 November 2015

This years advent calendar...

Simple and stylish


I love being a Rose&Grey Style ambassador....
it means that every now and then , I'll get sent an item from their beautiful collection of eclectic home wares and given free reins to style it how I'd like...
This time they sent out one of my favorite items...ever: This super useful Pegboard
Now my love for pegboard is well known, as I used some when I made my DIY sideboard this summer....So this sits perfectly in my interiors...


I had a few different ideas for how I wanted to style it up for Christmas...I mean: it is so useful!
But in the end I decided it would be perfect to use to hang little advent parcels for Mia Moo from!


I simply stretched some string between the pegs, then attached some plain paper bags, that I'd numbered using a stencil with some small wooden pegs..


And of course the little bags will be filled with daily treats for Mia to open each day in the countdown to Christmas....


It fits perfectly in with my simplistic Christmas decor look that I am going for this year...


Have you started planning the countdown to Christmas yet?
If not , I'm posting some inspirational ideas from the web for this years advent calendar next week...so stay tuned for that!

Friday, 13 November 2015

This years Christmas inspiration

minimal and simplistic
Image from By Fryd

This year I feel like simplifying everything....including Christmas!
Less is more, and I am feeling inspired by these wonderfully simple , yet Christmassy decor touches found on Pinterest...
Image from no home without you
Image from Fairynuf
Image from Annixen
Image via Segreto secrets
Image source : Expensive life
Image Daniella witte

Image via Hus og Hem

Image via Love Nordic


Image via Basic label Sweden
Short and sweet today...in tone with my simplistic Christmas inspiration I am going to let these images speak for themselves....

Tuesday, 10 November 2015

#PlantShelfie with a DIY plant pot...

Urban jungle bloggers
November Challenge


The November Urban Jungle Bloggers challenge is #PlantShelfie
So today I am sharing some pictures of my kitchen shelves....
....but in true Nostalgiecat style, I have a DIY plant pot tutorial thrown in....


I made this plant pot this summer, and I love how it looks with some autumnal heather in on my kitchen shelf...


Of course this is not the only DIY you can spot on my kitchen shelves...I shared these cute DIY hand drawn faces egg cups back at Easter (There is no tutorial, but you can find lots of great advice on drawing with marker pens on ceramics here)...and I love how some simple cactus' add to their personality...
And all though my "string of pearls" are looking a bit neglected, they are still one of my favorite greens...


Here's a little tutorial on how I made my Triangle plant pot:


I used:


You will also need:

Rolling pin
tool for cutting (a sharp knife will do)
Baking paper


Roll out the white polymer clay...just long and wide enough to fit around the cooking rings, approximately 5 mm thick + an extra bit to form the bottom of the plant pot
Use the Cooking rings to measure out the rolled out clay. Cut out a rectangle shape and a circle shape for your plant pot....

Next up, I rolled out the black oven bake clay, approximately 2mm thick this time.
Then I cut out some triangle shapes to place along the length of my white clay rectangle.
I used the rolling pin to press the triangles into the white clay....

 I placed one of the cooking rings on top of the bottom piece of clay, before wrapping the rectangular piece around the two cooking rings stacked on top of each other to form the pot.

NOTE!
I didn't get my cooking rings back out from the clay after cooking, but if YOU wrap some baking paper around yours, you should be able to....Learn from my mistake here peeps!!;)

Where the clay meets, use a knife to merge the clay together, and again to push the clay around the bottom of the pot together....then trim off any excess clay to neaten up around the base and along the top....

Cook in the oven for approximately 15 minutes at 150 degrees (or according to the instructions on you polymer clay)


If you are worried about using your kitchen oven for polymer clay, the clay manufacturers assures me that it's OK, as long as you cook out any left over fumes at high temperatures, then air out your oven for an hour or so...

So, there you have it. a DIY plant pot....


I've said it before, and I'll say it again: I love making my own decorative home wares....
Yes: I love being creative and making things....that's  kind of my thing....but more than that I love how  DIY-ing things means that you can make it how YOU want....and this technique is definitely custom-able to whatever shapes and patterns YOU would like to create....that way you end up with something unique and personal to you and your home decor...

And as for the plants....The perfect way to liven up a kitchen shelf....
Don't you think??

"