
Create a removable geometric window treatment
In my last post I showed you my mini hallway makeover, and part of this was my DIY faux stained glass window treatment for the back door!
The problem was that , in the summer, when sitting on the sofa in the front room, you were nearly blinded by the light coming through the glass panel of the back door.....Sometime in the past someone had tried to solve this by installing a flowery glass panel , but with little success....besides: I hated that dated flowery glass panel!! Something had to be done!!
I love the look of stained glass, and if money was no object, I would've commissioned my friend (and amazing stained glass artist) Flora Jamieson of through the round window to make me a panel for the back door....but it is: Money is tight!!
Besides: That would've meant forking out for a new door as well, as her pieces deserve a better setting than this old PVC door!!
So, I freshened up the finish of the door itself with a few coats of spray paint, then I came up with this cheap but cheerful solution:
A removable faux stained glass design!
This project is perfect if you are renting, and have a window that could do with a privacy treatment!!
Today I want to show you what I did!

This project doesn't require a lot of supplies, just some
sticky back plastic
Pencil and rubber
Ruler
Tape
Permanent marker in black
...and I used translucent glass paints, but you could probably use marker pens in different colours as well!
Oh...and some glass frosting spray paint (Nice, but not necessary!!)
First you'll need to measure the glass pane you want your faux stained glass to go on, then cut apiece of sticky back plastic to fit (If the area is wider than the roll of sticky back plastic, simply join two pieces together with tape) Make sure you leave a margin of at least 1 cm all around so you can tape the SBP (Sticky back plastic) down to your table/work bench....Gridded paper side up!!

Mark out the area in which you'll want your design to fit!
Next you want to draw your design onto the gridded paper side of the sticky back plastic!
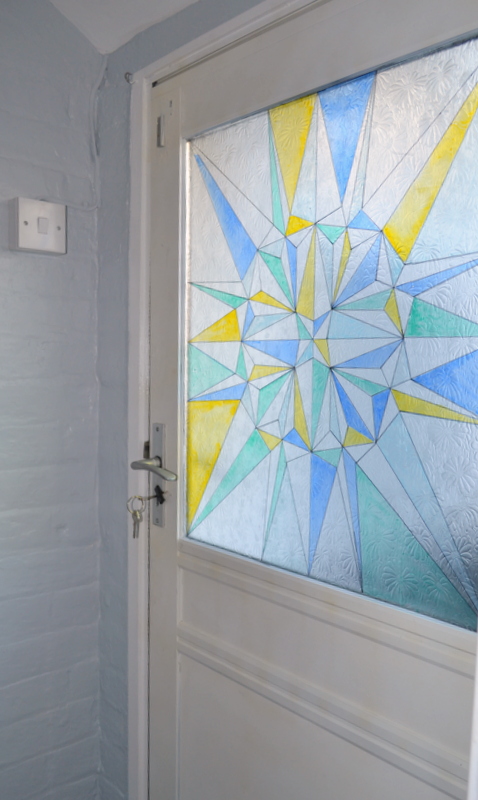
As I have a love of geometric shapes, I decided to make a star pattern to fit in with the pattern on the vinyl tiles I chose for the floor in my little hallway!! But of course you could choose any pattern that suits you,
( Maybe you could trace a pattern in a rug etc???) and use the technique described further down this post to create your own design faux stained glass!
I would've loved to create a PDF of my design for you all to download, but as it was so big I couldn't!
And a step by step on how I created my design was way too complicated for me to explain, but I will give you some TIPS ON CREATING A GEOMETRIC DESIGN!
Geometry is maths....basically! So you might find a calculator handy! And a ruler is essential!!
And use a pencil and have a rubber handy....you will probably make a mistake or two!!
When creating a geometric design ALWAYS start from the middle!
So find the middle of the area you want to cover (See picture above).....

Working your way out from the center of your design, take note of measurements and work on one area at the time!!
This sort of Geometry is all about mirroring the shapes! So once you've created the first section of your design, its basically a case of repeat, repeat, repeat!!
Have a big pot of strong coffee to hand, because this is going to take some time....AND YOUR FULL CONCENTRATION!!

Work your way out from the center and repeat and mirror the lines from the first section!
When you have created the finished geometric pattern, trace over the lines with a marker pen! You will probably find that there are lines in your design you don't want to be part of your finished design, so leave those out! Use your ruler to get neat and straight lines!!

Next up, you want to flip the sticky back plastic over, so it's the plastic side up!!
Your design should show trough!
At this point, it would be helpful if you tape the SBP down to a removable surface, such as a piece of cardboard etc.

....I took my design outside and gave it 3 coats of frosted glass spray paint!
This is not strictly necessary, but will give the finished Faux stained glass a slightly more authentic feel + it creates a good "key" for the paint in the next step to adhere to!!

Right! So I chose to use some transparent glass paints to colour in my design....because I had some!! But I'm pretty sure using permanent pens in different colours would also work well!! (You've just got to be extra careful as to not make any mistakes!!)
First I experimented with colours on a scrap bit of SBP.
If you've created a geometric pattern like me, CONGRATULATIONS....you get an A+....only joking...Seriously: keep to 3-4 different colours, or this process can get very complicated!!

When I had made my choice of colours, I painted in my pattern using a different paint brush for each colour...

Again: Start in the middle of the geometric pattern and work your way out....try to spread the impressions of the different colours evenly throughout your design...
I painted every-other section of my stars, leaving white gaps in between...

Colouring in a geometric design can be complicated and could get confusing....you will most likely make some mistakes....If you are using glass paints, like I did, you can simply clean off the paint with a moist rag or for more detailed mistakes: Use a q-tip to correct!! (above)
If you are using permanent marker pens to colour yours in, I would suggest maybe marking out which colour goes where with crayons before committing to pen!!

When you have finished colouring in your design, leave to dry/set for a while!!
Then dig out your ruler and black permanent marker again and trace over the lines, creating the "lead" effect!
I kept mine slim, but a thick pen-line would look great and more authentic!!

When you've traced all the lines, give it all a coat of clear varnish/ frosted glass effect spray and leave to dry!!
Your faux stained glass window is now ready to apply to the window pane!!

Trim off the excess SBP around the edges...

Peel off the backing at the TOP of your design (leaving the rest to hang down behind) and stick it to the top of the glass...
Next up You will need some pieces of paper, some tape and a credit card...

Tape a bit of paper to the glass surround, so that it hangs over your Sticky back plastic...this will help protect your design from rubbing off at the next step! (If your paper doesn't cover the entire area, tape another bit onto the first bit etc...)

Use the credit card to smooth down the sticky back plastic onto the glass.
Work on one area at the time, pulling your design taught as you go!Try to avoid creating any airbubbles or wrinkles, but if you do, use the credit card to smooth them down!
Gradually work your way down your design, pulling more and more of the backing off the SBP....until its all up!

And there you have it: Your faux stained glass panel...

I never realized how difficult it would be to photograph the "stained glass" with the light coming through the window (near impossible!!) so I'm sad to say: these photos doesn't do this project justice: It really does look great!!

I love the way it has changed the light in my little hallway, and it certainly helps with that sun glare when I'm relaxing on the sofa in the evening!!!!
And should I ever tire of it: All I have to do is peel it off again!


