Friday, 18 July 2014

Reclaimed scaffolding wood for new kitchen shelves...


How do you like my new kitchen shelves?
So....here's the reason why I needed to drill holes in my tiles (see my previous post here to see how)!!
Nice, hey??
And do you know what the best thing is about my new kitchen shelves??....I got the wood for free....fished out of a skip!! So apart from the 2 IKEA brackets, at £2 each...I made this shelf for practically nothing!!

Today I will show you how I reconditioned the wood to make these rustic looking kitchen shelves!!


I swear people think I'm mad around here! I am always looking through skips and bringing home items in various states of distress : Lugging home pieces of wood on the bus etc....
My husband certainly thinks I've lost the plot, as my shed is slowly filling up with rubbish....useful things for future projects!! Anyway, I had been on the lookout for weeks for a piece of wood to make some kitchen shelves with!! Actually: I did want to make a table, but lets start with the shelves!!
The other day, as luck would have it, I passed a skip: Lo and behold: the holy grail!! A dusty plank of old scaffolding board!! OOOH...the joy!! (And not too far from home either!! Result!!)
I pulled it out of the skip...getting covered in dust in the process (and some serious strange looks from passers by...) Brought it home and set to work immediately!!


First: I gave it a good scrub with bleach and water! (after all who knows where its been??....Oh! That's right: a skip!!)


Then I pulled out any old nails and staples...


Cut it to size with a wood-saw. (I chose the area of the plank that had most interest in the wood, in form of knots and cracks and damage etc......the more the merrier!!!)


Then I got out my trusty old palm-sander + 40grit sandpaper, and set to work!!
I wasn't after a very smooth finish, as I wanted it to look quite rustic (!!) But I sanded it back just enough to smooth down the surface and get rid of any splinters etc! I paid particular attention to the edges of the wood, using the palm sander to round off the corners a little!! 


When I was satisfied with the surfaces, I dusted it down and applied 1 coat of Danish oil to seal the wood!!
This darkened the wood initially, but later faded to reveal the beautiful patina of the old plank!! 


I left the plank overnight to soak up the oil, before attaching the IKEA brackets the following day!!


My new kitchen shelves were ready to hang up!!


I love how they turned out...better than I had imagined actually!!
(Oh! by the way: If you like my labelled glass jars, I will show you how I made the labels soon)


I love the way the rustic wood looks against my crisp new tiles!!

What do you think?
From a skip to your kitchen: Yay or nay??

I am so-nearly-there with the whole kitchen reveal...just waiting for the neighbor to come and fix up my new spotlights in the ceiling (There's another post, coming soon!!)

I am soo pleased with how it looks now!!
If you are curious, you can see how it used to look here
Cant wait to show you guys!!


Wednesday, 16 July 2014

How to: drill through tiles

OK...so maybe not the most exciting post ever, but very useful!

When I finished tiling my kitchen the other week (Oh boy! that was a BIG job!!!), I was very pleased with myself: It looks great!! But then to my horror I realized that I would now have to drill through my beautiful (If I say so myself...blush)new tiles!! 
This filled me with utter dread: I suffer from "hole-in-the-wall phobia" anyway, but drilling through tiles....!!! What if they crack and I ruin all my hard work??
But it had to be done!!

After consulting with anyone I could think of....(and Mr Google) i took a deep breath, and got to it!
And do you know what? It was easy...not at all scary, and I didn't damage a single tile!!


Turns out this is one of those jobs that simply requires the RIGHT TOOLS!!

A small masonry drill bit(2-3ml), some masking tape, a fully charged drill...
....and most importantly: A tile cutter drill bit!! (that's the one with the arrow head!!) They come in different sizes according to what you need! They cost between £3-4, and its definitely worth the money!!
...Oh and a bowl of water(?)

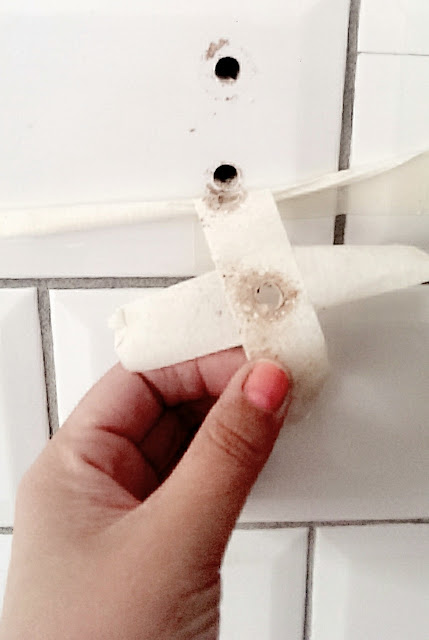
First mark where you need to drill the holes with a marker pen on the tiles, then cover each spot with a cross of masking tape.(This will give the drill bit something to grip into, instead of sliding around on a smooth tile!!)

Then use the small masonry drill bit to drill a pilot hole in the tile...Go slow with an even pressure!! This WILL take longer than expected!! Every now and then dip the drill bit into the bowl of water, to cool it down! (the friction will make it red hot, and could cause it to melt!!??)

That's all the hard work done!!

Next: Using your arrow-headed tile bit, place it into the pilot hole and watch it drill through the tile like a knife through butter!! Soooo good!!


When you're through the tile,  swap to a drill bit (same size) suitable for whatever your wall is made from (I used a masonry bit as my wall was bricks) and drill the hole deeper!
Job done!!
Remove the masking tape to reveal your perfectly drilled holes in the tiles!!
Now just add wall plugs and off you go!!

Not so scary after all!!??

On Saturday I will show you the reason why I needed to drill these holes...
...and I promise you: It looks amazing!!


Tuesday, 15 July 2014

New blog design

Hi!
Yes...you have come to the right place!
As you can see, Nostalgiecat has undergone quite a transformation in the last few days!!
How do you like my new blog design??
The wonderful Sarah from Trisarahtops smiles has worked her magic!!
I can highly recommend her services: Not only does she create the most amazing blog designs, but she makes the progress quick and easy....And she has the patience of a saint!!
(God knows i tested it with my flapping and indecisiveness!!)
I cant believe how quickly she came up with the header....which was spot on for the brief I gave her!!
All in all the process took about 1 day: from point of contact to finished blog design!!
And for just £15...an unbeatable price for a fab design and excellent service!!
I just love my new-look blog!!
I hope you like it too, and that you find it a bit easier to navigate (with the new floating menu bar at the top!!)
Anyway, Tomorrow it will be business as usual, and I will be back with another how to post
.....almost ready for the kitchen reveal now!!

"