inspired by the TRULY INSPIRATIONAL AND ORIGINAL DIY LACE BOWL TUTORIAL from lovemarkscollection.com |
| DIY lace jewelry dishes from nostalgiecat.blogspot.co.uk |
This week I have been enjoying myself making these beautiful lace printed jewelry dishes.
Part of their beauty is that they are really easy to make.
By pressing lace into oven bake clay you can get some beautiful patterns....
I am going to show you how....
DIY tutorial
You will need:
Oven hardening white clay (I used Sculpey original)
Lace or doilies
A rolling pin
A bowl or similar (used as a "cookie cutter")
Baking paper
Ovenproof dishes (to use for shaping the plates)
A scalpel
Sandpaper or sanding block
Lets get started........
1. Knead the oven hardening clay until soft and pliable.
Roll out the clay on a smooth surface like a cookie dough.
Keep rolling the clay with outward strokes until approx 5-6 mm thick.
Tip: Keep turning the clay over on the work surface to prevent the clay from sticking whilst you roll it out.
Make sure you have enough surface space to measure out the size of the plate you want to make.(in my case: a turned over fruit bowl )
Note: You'll get nicer edges to the plates if you use a bowl ,similar to this, to push the shape out of the clay, rather than cutting around using a scalpel or knife.
2.Before you press the lace into it, carefully transfer the rolled out clay to a sheet of baking paper. This will help you pick up your finished plate without distorting the shape or leaving fingerprints in the clay, ruining the beautiful pattern you are about to press into the clay.
Make a slight imprint with your "cookie cutter" in the clay, to mark out the area you'll want to print the lace on. Then position the lace/doily and pat down onto the clay. Then using a steady pressure with the rolling pin carefully press the lace into the clay until level...
Then gently peel off the lace to reveal a beautiful pattern!!
3. Place your "cookie cutter" on the clay and press down firmly and evenly until through.
Then peel away the surrounding clay, leaving you with a disc shape.
Knead the scraps to repeat processes 1-3, maybe with different lace....
Lift this disc into an ovenproof dish (with the right curvature to make your disc bowl shaped - I used my trusty vintage enamel bowls), with the help of the baking paper its laying on.
4.Bake in the oven in accordance with instructions on your packet of clay.
The Sculpey original that I used, needed approx 15 min per 5 mm thickness at 150 degrees/c*
Do not overbake!
Take out of oven, and leave in the ovenproof dish to cool down for no less than 20 minutes.
5. Whilst the clay is still a bit soft (cheesy), use a scalpel to neaten up the edges of the dishes
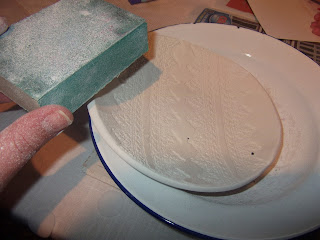
6.Then leave for at least another 2 hours to fully cure and harden, before sanding back the edges to finish off the dishes.
........and VOILA! Beautiful dishes to keep jewelry in, or to hang up in a group on a kitchen wall...
I really enjoyed making these, and think they turned out beautiful!!
The set of 4 dishes I made,only cost me £13.95 for the clay, as I had the other bits and bobs from before.
I am going to look into getting them glazed , as I think they need a protective surface!
So watch out for next week's follow up tutorial:
Thanks for looking and feel free to leave a comment or question below, and I will try my best to answer....
xxxJune


