So we've finally finished re-decorating Little miss Moo's room: Six months later than we planned, she has finally got her "big girls room"! But before I share the full transformation, I wanted to show you all the new artwork I made for her....
Gone are the teddy's and cute kitty pictures..(See my post about her toddler room)....in with her latest fad: Monster high!!
So I made her two pieces of monster high art for her new Pink walls, much in the same way as I did my Ampersand gold leaf art last week...
But I will show you a quick step by step guide to how I made these using gold leaf and glitter:
Step 1: Make a textured background
I placed some A3 paper on my work surface, and secured it using masking tape...Then I used the same paint as we've painted LMM's walls with, to tie the art in with her new room décor...
I then used some of LMM's play-dough rollers to add a textured pattern to the paper...
Step 2: The image

Like I said above, LMM is really into Monster high at the moment, so I printed out a monster high image (I added the crossbones for more interest)
Step 3: make some stickers for the gilding
I covered the entire image with double-sided tape, then added another layer of double-sided over the bits I wanted to gild with gold-leaf and glitter....
I then drew out my sticker shape with a pen on top of the tape...
...I then put another layer of double-sided on top of this again, crossing the direction of the tape layers. (Because I wanted to make 2 stickers, but also because this meant it would be easier to transfer the sticker in the next step:
I transferred the double sided tape (stickers) onto a sheet of baking paper, and put it to the side...
Going back to the image covered in one layer of double sided tape, I then cut out the image to make a stencil...I basically wanted to make a stencil so that I could easily paint out the shape of the monsters high image in black...
I then placed my stencil on the paper I textured earlier, and dabbed on black paint using a sponge...

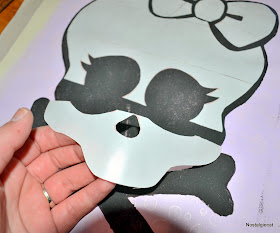
Using a sharp scalpel, I Cut out the shapes of my stickers (Slightly smaller than the stencil, so that there would be a black outline around my gilding...
I then placed the stickers on top of my black painted stencil on the paper...
The stickers will come away from the backing in parts, so I puzzled them carefully together before sticking down...

Step 3: Add some gold leaf
Peeling away one section of the backing of the sticker at the time, I used a soft brush to gently smooth down a sheet of gold leaf onto the image...
When I had covered the area I wanted (The "skull") with the gold-leaf, I carefully buffed away any excess by using my soft brush in circular motions...
I repeated this on my second picture.
Step 6: Add some glitter.
I got Little Miss Moo to help me add some glitter to the bows:
We peeled away the backing of the bow-stickers, and poured over some glitter...
LMM then rubbed the glitter into the tape, and we tipped away the excess.
That's it: LMM's DIY Monster High gold-leaf and glitter artwork for her new big girls room!!
All that was left to do, was to frame and hang the art...

LMM is very happy with her new artwork, and proud that she had a hand in making them...
They look great in her new room , as you can see in my Miss Moo's big room reveal post !

xxx
June


NIK TOD has over 25 years of experience in ART and is passionate about
ReplyDeleteexceeding your expectations.
artwork painting for sale