 |
| Glazed lace print plates from nostalgiecat.blogspot.co.uk |
Following up on last weeks tutorial, where I showed you how to make these.... this week I have been glazing the lace print dishes I made last week.
I spent some time researching different finishes, from using mica powders (thank you to Dominique from http://craftingbydominique.wordpress.com for your kind advice on using mica powders) to using homemade glaze (see tutorial:how to make your own homemade gloss glaze).
But in the end I decided to use the original
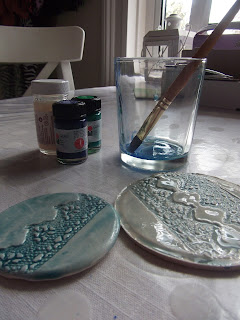
gloss glaze from Sculpey mixed with Marabu translucent glass paints.
When mixing media like this, make sure they are compatible with each other : in this case they are both water based ,without any need for baking.
I chose this mix, because I wanted to add colour with a translucent feel to the glaze.
I decided to use a mix of blues and greens.
Firstly I experimented by working on some samples to ensure that the mix had the right translucency and color.
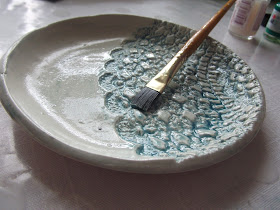
Then I simply painted on the mix with a soft bristle brush.....
....leave to dry for approx 30min
On the back of the plates, I simply saturated the surface with the glaze, then worked the it,using a brush, towards the edges, where I left it to pool at the rim. This created a nice band of stronger color.
When doing the surface of the plates, keep working the glaze into the pattern for the first 15 minutes to avoid it all running down and pooling in the plates. (after 15 minutes the glaze starts setting ,and you should avoid touching it at this stage, as that will lead to clumping)
Expect some pooling, as it is very hard to avoid all together.
When dried (30mins) I applied another layer of the glaze, changing the color slightly to add some depth, into the detail.
I used the same technique as above (back of plates) around the rim of the plates surface. I really like the effect it makes....
When I was happy with the look of my glazed plates, I left them to fully cure overnight, before finishing them off with a couple of layers of spray varnish to seal and protect the surface.
I am really pleased with my finished plates, and cant wait to hang them up on my kitchen wall (...when I eventually get around to decorating the kitchen....but thats another story for a future post). I have already had some orders for these from friends an family, and I think they make great presents...either on their own as jewelry trays or as a group like here, hanging up on a wall.....
Please let me know what you think of them by leaving a comment below. And if anyone has a tip about what varnish would be best to use as a sealant, please get in touch....(I used Plasticote clear spray varnish, but find It takes ages to properly set hard)
Thanks for looking, and please pop by tomorrow for some "behind the scenes" pictures..
xxJune


Hey June!!!! Great to find your blog and thanks for your lovely message. Your blog is gorgeous - some fantastic projects you've done - these plates turned out brilliantly - I shall have to make some with Nelly and Isla, they'd love it.
ReplyDeleteBe really great to see you guys SOON! We'd love to have you come and visit and meet your little Moo. Drop us an email (there is a link on my blog) and book yourselves in for a Spring or Summer visit.
Much love to you and Kev, Flo xx
Thanks Flora!! great to hear from you!!I couldn't find your e-mail address last night,but will look again!! Would loooove to come and see you all! Will be in touch!! xxjune
ReplyDeleteThey turned out so beautiful!
ReplyDeleteThese are absolutely beautiful. I would love for you to share them at this week's Project Inspire{d} ~ http://cupcakesandcrinoline.com/2013/08/project-inspired-linky-party-27/
ReplyDeletePinning!
Thank you Our Pinteresting family!! And thank you Mary Beth fot the invitation to link up to your amazing Inspire{d} party...I have just done it!! cant wait to have a look through all the other amazing projects on there...!! very excited!!
ReplyDeletexxJune
Brush wall plates
ReplyDelete