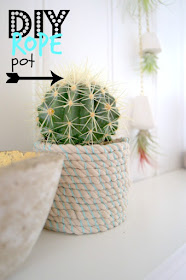
Still n the subject of plants and planters...I'm obsessed I know!
But today I wanted to share a little DIY planter with a difference:
It's made from rope!!
Rope and Hessian is one of the biggest micro trends (Can I even say that??) for interiors at the moment , and this is a neat little project to get in on the trend!
And it's pretty useful: You don't have to use this as a planter of course, how about making this for your desk to keep pens in, or to keep hair bands or make-up brushes in the bathroom??
And it's actually really easy and relaxing to do...
...I will show you how:
So all you need is some rope and a needle and thread.
Choose some thick white cotton rope (like this) and preferably some waxed cotton cord, like this in a funky colour of your choice. Using waxed thread makes the process easier, but normal embroidery thread will do as well! You will also need some scissors!
How much rope you will need depends on the size you want your pot to be, I used approximately 3 meter for mine!
Work at a table so that you can keep flattening the base (And also have a cup of coffee handy!)
Start off by folding the end of the rope and wrap the thread tightly around to secure the end.
Start creating the "line-pattern" (You'll see in a minute) by wrapping the thread around the rope at 1 cm intervals about 5-6 times...
Thread the needle onto the cord, then tightly coil the beginning of the base of your pot.
Start sewing the rope together, by wrapping the thread around, then just "catching" a tiny bit of the rope with the needle. Pull the thread tightly, but not TOO tight...
When you get to the second row, start catching the thread from the previous row instead of the rope, this way you will create that lovely "line pattern" on your pot.
It is easier to use a shorter length of thread. When you run out, simply finish that length under a line from the previous row, then rethread the needle and stitch the beginning of your new thread back through the same line (in the opposite direction), then tie the two ends together.
Let one end sit "inside" the pot, and one end sit on the "outside".
You can trim these ends away later, making sure that the knot sits hidden in between two rows of rope.
Keep sewing...
As the diameter of your pot-base grows, you may need to add in a few extra lines here and there.
If the space between the stitching is too far apart, the shape will not be as strong..
When you feel you need to, just add an extra line by catching the rope instead of the cord on the previous row (just like you did at the start).
TIP: I actually found it easier to stitch downwards off the edge of the table when creating the base for my pot!
Keep stitching the rope together until you have the diameter you need...
In my case, I simply eye-balled it to fit around my plant's pot!
Now it's time to move upwards:
I actually found this easier to do than making the base:
Start coiling the rows of rope upwards, on top of each other, and stitch as before...
When you reach your desired hight, cut the rope, and keep stitching till the end...
Then simply finish off by tightly winding the cord around the end of the rope:
This took me a couple of hours to make, but I had a few , what I like to call: "Social media distractions" under way...so if you stay away from your phone, put on some music and just get on with it without any procrastinations, like me, you could made your own rope pot in 1 and 1/2 hours, I'm sure!!
And for less than £5 you've got yourself a handy and unique pot, that you can proudly say you made yourself!!
If you do decide to use your rope-pot as a planter, like me, make sure the chosen plant doesn't need much or ANY watering! A cactus is ideal! Alternatively, make it with room for a little dish in the bottom to catch any water spillages!
I love mine, and I love how the softness of the rope contrasts with the prickliness of my cactus (appropriately nicknamed "Spikey" by Little Miss Moo LOL)
I hope you'r not fed up with my plant and pot obsession yet, as next week I'll have another 2 DIY planters for you, But before that , I will be reporting from the Ideal home show in London , as Hammonds furniture has kindly sent me some VIP (BIG smile ) tickets , and I am getting a chance to chat with off-the-telly famous Interior stylist Julia Kendall....so please pop back for that!

 |
| Please vote for me for best DIY blog |


